Sunday, December 18, 2011

Red Snapper Puttanesca (and the Vacation From Hell)


It feels like 100 years since my last post! My apologies, although I do have an awfully good excuse and a story to boot. I recently came back from a trip to visit my sister's family in Oregon, and a visit to my parent's condo in Palm Springs. The first part of the trip went as planned, and as usual my time with Holly, Sam and my adorable niece Claire was far too short. (Except for the 8 back-to-back readings of 10 Little Ladybugs, which I could have done without.) 

Girls in the kitchen- me, Holly, and Claire
As for the second part of the trip...well, it read a little like a movie script for National Lampoon's Palm Springs Vacation (starring Katherine Heigl, the prettier, more famous version of me). The script goes like this: young woman seeks rest and relaxation after a grueling month working multiple weekends at the office. She arrives at her parents recently remodeled and presumably vacant condo, only to discover that someone has clearly been living there. As the drama unfolds, young woman discovers evidence of shady business at the condo. Young woman gathers up her stuff and heads to a hotel. Enter locksmiths, police, confiscation of illegal paraphernalia, cleaning crews, and alarm installation. Just as soon as it appears the worst is over, and the young woman might actually be able to salvage the last few days of her vacation and make it to the fantastic outlet mall 20 miles away, young woman's 86-year-old back goes out. And grounds her. In her hotel room. For the rest of the trip.


But WAIT...the antics don't stop there!  Upon the young woman's return home (hallelujah!), she discovers that the entire contents of her chest freezer are roughly the temperature of luke-warm water. For the young woman, who loves salmon fishing, and uses Costco as her neighborhood grocery store, and gets a thrill out of buying in bulk and freezing things for later use, well...you get the idea.


Sounds like a movie, right? Nope, that was my LIFE. Two weeks I'd rather forget. Although I did scrape together a happy ending with the generosity and kindness of all of my wonderful friends who have lent me a hand while I laid on the couch and watched them work.  Unfortunately, I had planned to work on so many posts from the comfort of a lounge chair next to the pool. Seeing as how I could only tolerate a sitting position for about 4 minutes at a time, that never happened.


As my back is nearly recovered from the trauma of vacation, I finally have an opportunity to post a delicious recipe that Holly and I made before the Vacation From Hell really began.  It's a recipe for Red Snapper Puttanesca inspired from a recipe for Cod Puttanesca in the wonderful cookbook Mother's Best, which is a collection of recipes from the woman behind Mother's Bistro in Portland (not to be missed!). It's also one of the best birthday presents my sister has ever given me.  This is a great healthy meal to make around the holidays when friends, family, and coworkers are shoving Mexican wedding cakes, homemade fudge, and peanut brittle in your face.

Puttanesca sauces are bold and delicious- full of tomatoes, capers, and olives. The word "puttanesca" roughly translates in Italian to "ladies of the night." Apparently, those ladies don't have a lot of time on their hands to shop at the grocery store, so they throw together sauces from pantry staples. Whether that's true or not is irrelevant. I just like the word "puttanesca." It's got a ring to it.  Say it over and over and you'll see what I mean.


Holly and I traveled to her local fish market and found some beautiful pieces of red snapper, but you could also use cod or halibut- any mild fish will do.  Just make sure you work with a thin fillet. If it's thick (as often halibut is) then you might have to finish the fish in the oven after browning on both sides to ensure that it's done, or slice the fillet in two.  Salt and pepper both sides of the fish, then dredge in the flour and shake off all the excess.  Saute in olive oil until golden brown, or about 3 minutes each side (don't overcook them!  Nothing tastes worse than overcooked fish).  I did this in batches so that I didn't overcrowd the pan, so I periodically added more olive oil as needed.


When the fish is done, put them on a baking dish and keep them in the warm oven until you're ready to serve.  In the meantime, using the same saute pan (you might need to add a little more olive oil) cook the garlic for about 30 second or so until it's just brown (overcooking garlic makes it taste bitter).  Add the tomatoes and a few grinds of pepper and cook for about 2 more minutes. 


Add the olives, capers, wine, and chopped parsley.  Turn up the heat to medium-high and cook for a few more minutes until the sauce is slightly reduced.  At this point, taste for seasoning.  My capers were so salty that I didn't need to add any salt to the sauce!


Remove the pan from the heat and, if you want, add the butter (this really adds richness to the sauce, but is not necessary if you'd rather leave it out).  Remove the fish from the oven and you're ready to eat!  I like to serve this family-style, so I piled the fish on a serving platter and spooned sauce over the top.


Top it with chopped fresh parsley and you've got yourself a beautiful dinner.  If you have extra sauce, put it in a bowl on the table for folks to spoon on themselves (it was so good I just started eating it with a spoon).  I loved this dish, and I think next time I'll try adding some anchovies and red pepper to the sauce for added flavor and kick. 

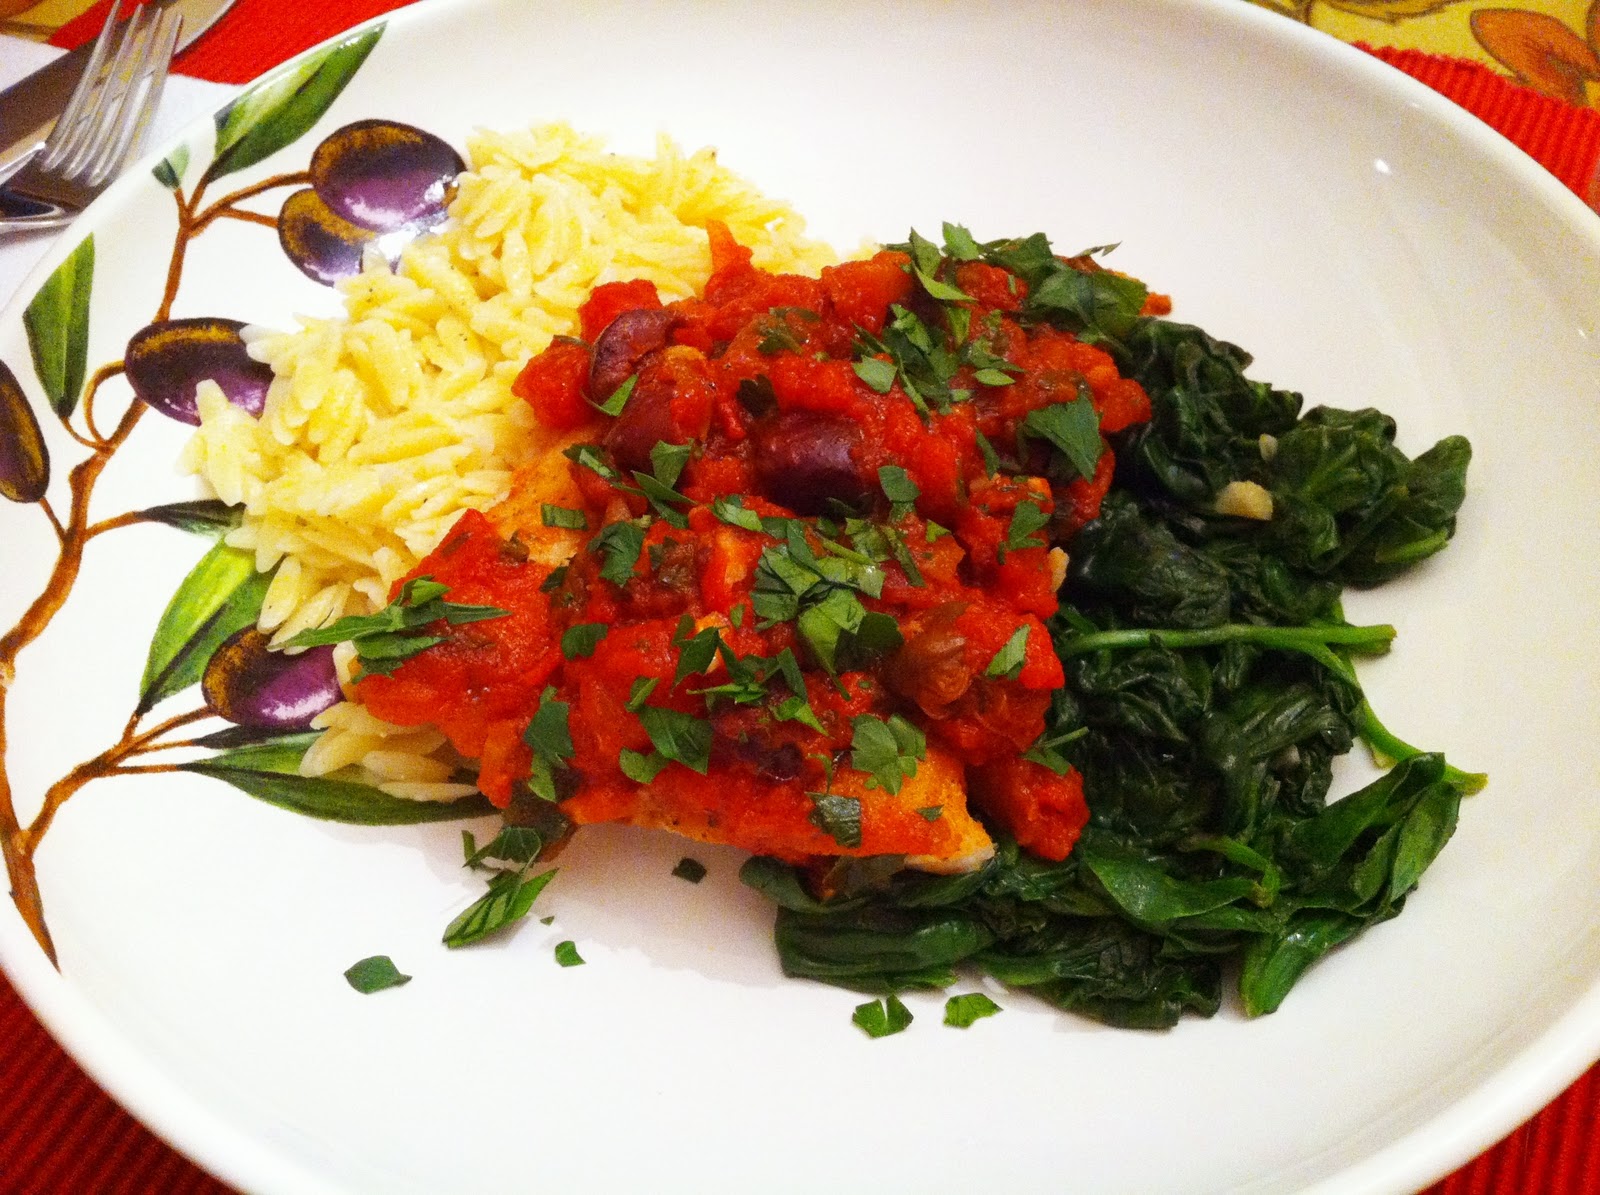
Serve this dish with rice or orzo pasta and sauteed spinach.  Delicious and healthy holiday fare!


Red Snapper Puttanesca
(adapted from Mother's Best: Comfort Food That Takes You Home Again)

4 (6-ounce) red snapper or cod fillets (about 1½ pounds)
1¼ cup flour
3 T.(or more) olive oil
1½ cups good-quality diced or chopped canned tomatoes (or two medium diced fresh tomatoes if they're in season)
5 cloves garlic, finely chopped
1/3 cup pitted kalamata or niçoise olives
2 T. capers, drained and rinsed
¼ cup white wine (I used pinot grigio)
2 T. butter (optional)

kosher salt and freshly ground pepper
Orzo and sautéed spinach, for serving

Preheat the oven to 200 degrees.  Sprinkle salt and pepper on both sides of the fillets.  Place saute pan over medium heat and add olive oil.  Dredge fillets in flour, making sure to shake off the excess.  Place in saute pan and cook to a golden brown, about 3 minutes each side being careful not to overcook them.  (If your fillets are on the larger side, do this in batches so you don't overcrowd the pan.  Just add a little more olive oil each time you cook a new batch.)

When the fish is done, place on an oven-safe baking dish and keep warm in the oven.

Add garlic to the pan (you may have to add a little more olive oil) and saute for about 30 seconds, or until it's just brown.  Add tomatoes and a few grinds of pepper and cook for about two minutes more.  Add capers, olives, white wine, and parsley (reserving a little for garnish).  Turn the heat up to medium-high and cook for several more minutes, or until the sauce has reduced a bit.  Once it's done, remove from the heat and stir in the butter.

Check for seasoning- capers and olives are often very salty, so you may not need any salt.  Remove fish from the oven, top with the sauce and a little more parsley.  Put leftover sauce in a bowl for the table.  Serve with rice or orzo pasta and a side of sauteed spinach. 

Enjoy!  xo H

Sunday, November 6, 2011

Italian Wedding Soup


Fall has now turned to winter, and the snow flakes have transformed the landscape once again.  Milo the wonder pup is thrilled- snow chasing is his favorite sport of all time.  (What, it's not a sport?  Don't tell him, he thinks he's in training.)

 
I love the fresh food of spring and summer, but there's something so deeply satisfying about the smells that come out of a winter kitchen.  Warm, hearty dishes designed to warm the soul when it's, oh, about 8 degrees outside.  Which it will be...very soon.

I've mentioned this before, but if my job in life was to follow a recipe down to the last teaspoon I'd be living out on the streets.  It is not uncommon for friends to come over and see three seperate cookbooks opened up to a clam chowder recipe (yeah, that happened).  Usually, when I want to see how a singular recipe actually turns out without modifying it, I make a phone call to my sister Holly.  She'll actually follow a recipe the first time.  Plus, we both have the cooking gene, we have similar styles of cooking (transl: each of us owns all of Ina Garten's cookbooks), and we look an awful lot alike.  No, that last characteristic doesn't really help us in the kitchen, but it is fun to tell people about how my brother-in-law Sam thought we were the same person roaming the halls at Willamette Law School for almost an entire school year.  (Yeah, that happened too.)

A few years ago I made my first batch of homemade chicken stock.  I was completely pleased with myself.  After refrigerating it, skimming the fat, and pouring the stock into individual containers for freezing, I thought...now what?  I called Holly, who told me to try this soup from our girl Ina.  Holy moly, after that I wanted to dedicate my homemade stock solely to this dish.  This is a delicious Italian-American soup which I doubt is served at Italian weddings- I've heard that the "wedding" part of this dish actually refers to the wonderful marriage between meat and vegetables.  In that case, "I do."

 True to form, this is my own version of Ina's terrific recipe.  I think my changes simplify the soup without sacrificing any flavor.  First, you start with the meatballs.  Usually Italian Wedding Soup calls for beef meatballs, but Ina uses chicken and I love the flavor.  Like homemade chicken noodle soup with the volume turned up. 

The original recipe uses a mix of ground chicken and ground chicken sausage.  I think that requires opening too many different packages, so I just use chicken sausage and they're delish.  (In fact, these meatballs are so good on their own you could use this as appetizers for your next holiday party served with a side of marinara.) In a pinch, I've used turkey sausage.  But lately chicken sausage has been easier to come by so I find I don't need to substitute as often.  For the meatballs, the food processor is a cook's best friend.  I whir up the Parmesan and the bread crumbs (any white bread will do, and even wheat if it's all you have, but I used the artisan white loaf from my friend Janis at Fire Island Rustic Bakeshop- my favorite bread ever!) in the food processor, easy peasy.


Great tip: "grate" Parmesan in the food processor.  Just throw chunks of cheese in and let 'er rip.

If you use store-bought breadcrumbs, you may need to add a little more milk to the meatball mixture because it might be a little dry.  After all the meatball ingredients are mixed, drop them by the rounded spoonful onto a parchment-lined baking sheet- it makes roughly 35 meatballs. 

Baked meatballs.  These are tasty, tasty balls. 
While the meatballs are baking, start the soup by sauteing the onion, celery, and carrots in a little olive oil.  Once they're soft, add the stock and wine and bring it to a boil.  Turn the soup down to a simmer and add the pasta.  I like using little ABC's or stars.


Cook the pasta in the simmering water for about 8 minutes, or until the pasta is tender.  Then add the chopped dill, kale or spinach, and the meatballs. 


Cook for another minute, and taste for salt & pepper.  Ladle the delicious soup into bowls and top with a little more grated Parm.  Yummy, yummy, yummy, yummy.


Italian Wedding Soup
(Adapted from Barefoot Contessa)

For the meatballs:
1 lb. chicken sausauge (make sure it's not the already-cooked variety)
2 T. milk
2/3 c. fresh breadcrumbs
1/3 c. grated Parmesan
1 egg, beaten
2 cloves garlic, minced
2 T. chopped parsley
kosher salt and fresh pepper

For the soup:
2 tablespoons olive oil
1 medium onion, diced
3 carrots, diced
2 celery ribs, diced
10 c. chicken stock (preferably homemade- see recipe below)
1/2 c. dry white wine (I usually use a savignon blanc or pinot grigio, or whatever is leftover in the fridge)
1 c. small pasta (I usually use stars)
1/2 minced fresh dill
6 oz. kale, ribs removed and chopped, or 12 oz. baby spinach 

1.  Preheat the oven to 350 degrees.

2.  For the meatballs: combine all ingredients gently with your hands or a fork.  Drop by rounded spoonfuls on a baking sheet lined with parchment paper.  You should have about 35 meatballs, give or take a few.  Bake for 30 minutes, or until golden brown.

3.  For the soup: on medium-low heat, add the olive oil to a large soup pot.  Cook the onions, celery, and carrots for 8-10 minutes or until soft.  Add the stock and wine and bring it to a boil.  Turn down to a simmer and add the pasta.  Cook about 8 minutes or until the pasta is tender.  Add the dill, meatballs, and kale or spinach and cook for about one more minute. 

4.  Ladle the soup into bowls and top with a little extra grated Parmesan.  (And the soup tastes even better the next day!)

The Best Homemade Chicken Stock
(Makes about 20 cups of stock)

Don't bother peeling the veggies- just make sure they're well scrubbed!  After making stock a few times, I've found that roasting the veggies makes the most delicious stock.

2- 5 pound chickens
6 carrots, sliced in half lengthwise
4 celery ribs with their tops if they have them, sliced in thirds lengthwise
2 onions, sliced in half
20 sprigs of parsley
20 sprigs of dill
20 sprigs of thyme
2 t. peppercorns
2 bay leaves
2 T. salt


1.  Preheat the oven to 425 degrees.  Remove the giblets from the chicken, but save the neck.  Rinse and pat dry.  Cut the wings off the chickens.

2.  Put the chicken wings, carrots, celery, and onion in a large roasting pan.  Toss with 1-2 tablespoons of olive oil, a good pinch of salt and peppper.  Toss together, then roast in the oven for 35-40 minutes.

3.  In the meantime, place the chickens in a large stock pot (the biggest one you have).  Fill the pot with 5 1/2 quarts of cold water.  When the veggies are done, add the veggies and the rest of the ingredients to the pot.  (If you have a stock bag, which is similar to cheesecloth, place the veggies, chicken wings, the herbs, and peppercorns in the bag, tie it off, and place it in the pot with the chickens.)

4.  Bring the pot to a boil (this will take a little while).  Once boiling, lower the heat and simmer the pot uncovered for 4 hours.  Remove the scum when it forms.  After about an hour of simmering, remove the chicken and let it cool for a bit.  Remove all of the chicken meat and put the bones back in the pot to simmer (if you don't remove the chicken meat now, it will be the consistency of shoe leather after 4 hours).  Save the meat for another use (I put it in plastic baggies, wait for it to cool in the fridge, and freeze it for later).

5.  Strain the contents into plastic containers and refrigerate overnight.  The next day, skim the fat from the top of the stock, and use the stock within a few days, or freeze.  This is the secret to the best soups you've ever tasted!

Enjoy! xo H

Monday, October 24, 2011

Brownie Cookies

I spent last weekend with my brother's family in Fairbanks.  Staying at Erik and Emily's house in October is a lot like staying at a ski lodge in the off-season.  It's a beautiful home built with love and care by my Dad, nestled right on the bank of the Chena River.  With a stone fireplace, warm furnishings, and gorgeous wood trim throughout, it's one of the loveliest homes I've ever been in and it's a real source of pride for my family.  It also makes my house look more akin to a shack.  And it would feel more like staying at a lodge if I didn't have to cook for the entire family in order to earn my stay.  (At least according to Erik- I'm pretty sure Emily would let me stay there for free.) 

All kidding aside, I love cooking for my brother and sister in law.  Cooking in their beautiful kitchen is like a dream compared to cooking in my own, which is roughly the size of a postage stamp.  This time I made a huge pot of my creamy tomato soup, and my 2 year old niece Annika DEVOURED it.  She ditched her spoon, took the bowl between both hands and gulped it down.  My kind of kid!

When I arrived at their house, I brought a few cookies to share that I'd made at home the day before I left.  They're a recipe from one of my favorite cookbooks, The Foster's Market Cookbook, which was a gift from my friend Marika several years ago.  It's a market near her law school in North Carolina and its cookbook is filled with delicious recipes, including heavenly baked goods.  These cookies are called "Chocolate Whoppers," but their taste and texture is so similar to my beloved brownies that I simply call them Brownie Cookies.  They're deliciously rich, and Erik and Emily loved them so much that I made them another batch from scratch.

The key to these cookies is locating instant espresso powder.  I used to use regular instant coffee, but I found this at your-everyday-grocery-store in Fairbanks (rhymes with Shred Shrymers).  Honestly, I think I'm so used to not finding supposed "specialty" items in Fairbanks that I'm not sure I looked hard enough for it before!  The coffee really brings out the richness of the chocolate, and it's why a lot of chocolate cake recipes call for strong coffee in the batter. 
 
As with most cookie recipes, you start by mixing the wet ingredients.  Mix the eggs, vanilla, and espresso powder.  Add the sugar and mix until creamy.  In another small bowl, use a whisk to mix together the flour, baking powder and salt.  Set that aside for now.

Next, chop up the walnuts (or pecans if you prefer).


Now for the chocolate.  The original recipe calls for a mix of semi-sweet and bittersweet chocolate, but I found the cookies tasted great with just semisweet, and I tend to think using chocolate with various levels of sweetness in a recipe is a bit tedious if there's not a huge payoff for it.  Melt the first amount of chocolate with the butter over a double boiler.  This is just a way to gently melt the chocolate without burning it, and it's really easy.  Find a glass bowl that fits over the top of a standard pot.  Then fill the pot with water and bring it to a boil on the stove, then turn the heat down to a simmer.  Place the glass bowl on top, toss in the chocolate and the butter and stir until melted and silky smooth.  Once melted, set it aside.


Finally, you're ready to throw it all together.  Add the chocolate mixture to the egg mixture and mix to combine.  Add the flour mixture and mix only until moist.  Finally, toss in the walnuts and second amount of chocolate chips and just barely mix until combined- sometimes this last step I do by hand so I don't overmix the batter.

Use a 1/4 cup cookie scoop and drop the cookies about 2-3 inches apart on the cookie trays.  You can spray the pans first with nonstick cooking spray, but I actually like baking cookies better on parchment paper- it never sticks and it makes for easy cleanup!


Bake the cookies for 10-12 minutes, turning the pans once.  [NOTE: If you are not using your own oven, be careful NOT to set the unfamiliar oven you're using to "preheat," rather than the actual baking temperature of 325 degrees.  Not that I did this at Erik and Emily's house.  But if I had, I would have ended up with seriously flat and underbaked cookies.  And merciless teasing from my brother about "being smarter than the oven."  Like I said, this is all hypothetical.]

When you take them out of the oven (assuming you bake them at the proper temperature), they sort of look slightly underbaked, which is just how they should look.  Let them cool on the pan for 10-15 minutes before carefully removing each cookie to a baking rack to fully cool.  These babies are ooey-gooey, rich, and best eaten with a glass of milk in hand.

Due to a certain "oven malfunction" in Fairbanks, here is a picture of a batch I made earlier that week.

Brownie Cookies
(a.k.a. "Chocolate Whoppers," adapted from The Foster's Market Cookbook)

8 oz. good quality semi-sweet chocolate (I used Ghiradelli chips)
6 T. (3/4 stick) unsalted butter
2 eggs
1 T., plus 2 t. instant espresso powder
2 t. vanilla extract
3/4 c. sugar
1/3 c. flour
1 t. baking powder
1/2 t. salt
2 cups chopped walnuts
1 c. semi-sweet chocolate chips

Preheat the oven to 325 degrees. Line two baking sheets with parchment paper and set aside. 

Cream together the eggs, espresso powder, and vanilla in a large bowl with an electric mixer. Add the sugar and mix until creamy.

In a separate bowl, use a whisk to mix together the flour, baking powder, and salt.   Set aside.

Next, melt together the first amount of semisweet chocolate and butter in a double boiler over low heat until just melted, stirring occasionally. Remove the chocolate mixture from the heat as soon as it's melted.  Add the chocolate mixture to the egg mixture and blend until combined. Add the flour mixture and stir just until the dry ingredients are moist.

Fold in the chopped walnuts and chocolate chips.

Scoop the batter with a ¼-cup cookie scoop or large tablespoon and drop onto the baking sheets about 2-3 inches apart. Bake the cookies right away, before the chocolate begins to cool and harden.

Bake 10 to 12 minutes, turning the baking sheets once during the cooking time. The cookies will seem a bit gooey on the inside, but they will cool perfectly.  The cookies will still be very gooey inside and soft, but do not overcook or the cooled cookies will be dry.

Cool the cookies on the baking sheets for 10-15 minutes before carefully removing them to baking racks to cool completely.


Enjoy! xo H

Tuesday, October 4, 2011

Outrageous Chicken

Let's have an honest moment here.  Up until this point, this little blog of mine has been an extremely friendly place for my vegetarian friends.  This is more of a happy coincidence than anything else, but it does reveal a little bit about my style of cooking.  I love veggies, and there are literally countless ways to prepare them.  My parents never had to force me to eat my Brussels sprouts, or finish my broccoli.  In fact, my brother and sister and I were always great about eating our vegetables, and I think that's a huge tribute to having two parents who were wonderful cooks and realized the importance feeding a well-balanced diet to their children.  I'm so happy to see that both my brother and my sister recognize the importance of this with their own children.  My family is a family of GOOD EATERS.  Those of you who know me well know that my love for good food and cooking is no accident.

That said, to my vegetarian friends:  I love you.  But you can stop reading now.

Because today, I'm sharing one of the best chicken dishes I've ever tasted.  While I love my veggies, I also love a beautiful, juicy, tender piece of meat.  Ironically, this dish was discovered on a quest to prepare a meat dish for my vegetarian friend Rebecca's wedding.  Ha!  The wedding was a potluck feast, and they requested some omnivore-friendly dishes for the spread.  I didn't want to make anything just ordinary, so as I often do I polled my friends to see if they had any ideas.  Enter my friend Heather, who is a fabulous cook and handed me this gem of a recipe.  It's actually a very well known recipe called Chicken Marbella from The Silver Palate Cookbook, but she told me she just calls it "Outrageous Chicken."  And she's right, because it's OUTRAGEOUS. 

After the guests had feasted at the wedding, I was in line to refill my glass of wine and started up a conversation with a woman next to me.  (As my friend Laura says, I've never met a stranger!)  When I introduced myself, her face suddenly changed and she said to me, "Are you the Heidi that brought that chicken dish?  Oh my God, that was delicious!  Can I have the recipe?"  I think I started floating a bit after she said that. (Although no one else will claim I was "floating" 3 hours later while working the dance floor to "Footloose" after several glasses of wine, but that's beside the point...) 

For Rebecca's wedding, I prepared the dish crockpot style.  It turned out delicious, but it's really best baked in the oven so that the skin gets beautifully golden and crispy.  I loved this dish so much that I made it just a few weeks later at my friend Mera's baby shower.  Needless to say, they loved it too.  In fact, so many requested the recipe at the shower that I promised to post it soon.  The wait is over!

The shower spread screamed fall.

When I read the ingredients for the marinade, I had a very good feeling about this recipe.  Some of you might think that it sounds a bit strange, but you'll just have to trust me on this one because I don't think there's a person on this planet who has tried this chicken and not liked it.  Consisting of red wine vinegar, olive oil, garlic, capers, dried oregano, bay leaves, green olives, and prunes, it sounds a little...weird.  But weird in a delicious way!


The original recipe requires you to quarter 4 whole chickens at 2 1/2 pounds each, but that's too much work for me.  Instead, I did what my friend Heather suggested and used 10 pounds of bone-in, skin-on chicken thighs-- my favorite piece of the bird.  You could use any part of the chicken you like, and I think boneless, skinless chicken will work too.  But my preference is always bone-in with skin, because that's where chicken derives so much of its flavor.  The original recipe also calls for whole olives and prunes, but my olives and prunes were really big, so I halved both of them.  You don't have to, especially if you're short on time.  You could also get fancy with the olives, but I'd previously purchased a double-pack of Spanish olives stuffed with pimientos from my beloved warehouse store (I could write an entire post on why it's a terrible idea for a single girl to use Costco as her main grocery store).  I just sliced each olive in half and 86'd the pimiento.  Easy peasy.

(Note that this makes a HUGE amount of chicken, so unless you're preparing this meal for a large party, you can easily devide the recipe in half.)

What I love about this dish is its utter simplicity.  Most of the work is done in assembling the marinade.  Once you add the chicken to the marinade, cover it and let it marinate overnight. 


(I forgot to take a picture of the big dish of chicken marinating, but this is the two chicken thighs I stashed away for my dinner the next night!)

The next day, place the chicken and the marinade in two 9 x 13 inch baking dishes.  Pour a 1/2 cup of white wine over each of the dishes, and sprinkle the top of the chicken with brown sugar.  The original recipe requires you to place the chicken and the marinade on a shallow baking pan (think large cookie tray), and bast the chicken often with the juices.  But I've found you get a similar result, without all of the basting, by using two 9  x 13 inch baking dishes.  The chicken is immersed in more of the liquid, which eliminates the need for basting, but the skin is still exposed to maximize crispy deliciousness.

If this doesn't look good to you, your eyes are broken.

You really can't go wrong with this chicken.  Tangy, sweet, and fall-off-the-bone tender.  Plus, it's a beautiful dish.  Your friends will think you're an amazing cook, and they don't need to know how easy it was (unless they ask for the recipe, and they will!)  Serve it with any good starch to soak up the beautiful juices- a lovely pile of buttery mashed potatoes or a pillow of soft, creamy polenta would be perfect.  But it's also great just on its own.


Outrageous Chicken, a.k.a. Chicken Marbella

10 lb. chicken pieces, bone-in and skin-on (or 4 chickens, 2 ½ lbs. each, quartered)
cloves from 1 head of garlic, peeled and finely pureed
1/4 c. dried oregano
kosher salt and freshly ground pepper to taste
1/2 c. red wine vinegar
1/2 c. olive oil
1 c. pitted prunes, halved
1/2 c. pitted Spanish green olives, halved
1/2 c. capers with a little juice
6 bay leaves
1 c. brown sugar
1 c. white wine
1/4 c. chopped parsley (optional)

Preheat the oven to 350 degrees.

In a large bowl, combine pureed garlic, oregano, vinegar, olive oil, prunes, olives, capers and juice, bay leaves, and kosher salt and freshly ground pepper to taste.  Add chicken and mix well (you may need to divide the mixture into two bowls if you make the entire recipe). Cover and let marinate in the refrigerator overnight.

The next day, place the chicken in a single layer in two 9x13 inch baking dishes and spoon marinade evenly over all pieces. Sprinkle the chicken with brown sugar and pour white wine around them.

Bake the chicken for about one hour. The chicken is done when its juices run yellow (as opposed to pink). Sprinkle with parsley before serving.
(This makes enough chicken for a party, so note that this recipe can easily be divided in half!)

Enjoy! xo H

Thursday, September 22, 2011

Eat Your Beets (trust me, you'll like 'em!)

I spent last week in Las Vegas at my Union convention.  Don't get me wrong- I had a great time.  It's just that a week in Vegas feels like a month anywhere else.  Late nights, long receptions, plenty of cocktails, late nights, delicious rich food, late nights.  It's exhausting.  I woke up Saturday morning in my own bed and committed myself to trying to stave off the lung cancer I'm pretty sure I developed by spending a week in smoky Vegas casinos.  I got 9 hours of sleep, went straight to the gym, ate a fully-vegan lunch, bought a bunch of beautiful veggies at the farmers' market, and breathed in as much fresh Alaskan air as I could.

I almost feel whole again.

Spending time at my local farmers' market instantly makes me feel better.  I'm pretty sure that just by staring at the vegetables, my LDL cholesterol levels drop.  I think I've mentioned this before, but the farmers market is a dangerous place for a girl like me.  I go there for onions and kale, and come home with enough produce to stock my neighborhood grocery store.  I'm not exaggerating.  See Exhibit A:

From a single farmers' market trip last summer.

Go big or go home, right? 

Right before I left on my trip, I started a little beet kick.  Truthfully, I started this kick when I lived in Fairbanks the year after law school.  My mom and I would hit the Tanana Valley Farmers' Market almost every Saturday, and on one of these trips a woman had prepared some pickled beets as a way to entice people to buy some of her crop.  I was instantly skeptical.  I'd had beets before.  They had what hoity-toity, elitest TV chefs (whom I watch obsessively) call that "earthy" flavor (transl:  tastes a little like dirt).  But I tried them, and I was SOLD.  The beets were delicious- soft, but with a little bite to them, tangy and slightly sweet.  After that, I ate beets all summer.

Look how beautiful these beets are!
In Alaska this time of year, the market is full of beautiful beets- purple, golden, and my favorite, chioggia.  Lovely red and white candy cane striped beets that are beautiful for this simple, delicious fall dish:  roasted beet and goat cheese salad.  I've been eating this dish for three weeks straight, so I thought I'd better share it if I can't get enough of it!

To start, scrub four large beets or 8 small ones, chop off their root tails and any greens that are left.  Tear off two large pieces of aluminum foil.  Place half of the beets on one of the pieces of aluminum foil, and repeat with the other. Rub the beets with a little olive oil and sprinkling generously with salt and pepper.  Wrap each package of beets tightly and roast them in a 400 degree oven for about an hour. 

While the beets are roasting, make a simple vinaigrette of olive oil, champagne vinegar (white wine vinegar should work too), dijon mustard, honey, salt and pepper.

Once you remove the beets from the oven, open the foil and let them cool enough to handle.  Next, take each beet in one or two paper towels and rub the skin off the cooked beets.  Works like magic!  (This trick is a dream for those of us who are too lazy to peel anything the old fashioned way.)   

Slice the beets into bite sized pieces and toss with a sprinkling of salt and enough dressing to your liking while they're still warm (they soak up more vinaigrette that way).  Just before serving, toss with the chopped tarragon and top with the crumbled goat cheese.

It's almost too pretty to eat.  Almost.  Trust me, grab a fork and dig in!


Roasted Beets with Goat Cheese

2 lb. beets (about 4 large, or 8 small)
1 T. olive oil (first amount)
1 t. salt
2 T. chopped tarragon (or parsley, optional)
2 oz. goat cheese, crumbled

For the vinaigrette:
1/4 c. olive oil (second amount)
1/4 c. champagne or white wine vinegar
2 t. dijon mustard
1 T. honey
salt and pepper

Preheat the oven to 400 degrees.  Scrub the beets, removing any greens and the tail.  Tear two large pieces of aluminum foil and place half of the beets on each of the foil pieces on a large sheet tray.  Rub the beets with 2 teaspoons of olive oil (more or less- just to cover the beets) and sprinkle with 1 teaspoon of salt.  Wrap each into a foil package and place the sheet tray in the oven for 1 hour.

To make the vinaigrette, whisk together the second amount of olive oil, vinegar, dijon mustard, honey, and a generous sprinkling of salt and pepper.

When the beets are done, remove from the oven and open the foil packages to allow the beets to cool a bit before handling.  While still warm, rub each of the beets with a paper towel to remove the skin.  Slice the beets and place in a large bowl.  While they're still warm, sprinkle the beets with a little salt and toss with enough of the vinaigrette to coat the beets (you probably will not need to use all of it).  Toss in the chopped tarragon and right before serving, sprinkle the crumbled goat cheese on top.  Your heart will thank you!

Enjoy! xo H


Monday, September 5, 2011

A Weekend in Halibut Cove

There are a few places in the world where I feel like I become the best version of myself. In front of the fireplace with my family at my childhood home in Fairbanks. On my Dad's boat in the middle of Prince William Sound. When my nieces are on my lap. On the north shore of Kauai. Anywhere when my sister is with me. And at a cozy cabin on a perch in Halibut Cove, Alaska.

I love this cabin, and the friend who inhabits it. The story of our introduction is one of my favorites (I even told it at her wedding!) About seven years ago when I first moved to Anchorage from Fairbanks, I went to a Halloween party. Dressed as Rosie the Riveter (my costume for four years running- I lack creativity in this department), I barely knew anyone at the party. But my roommate introduced me to one of her coworkers, Mera. Easily the most striking woman at the party, what struck me most about Mera was her costume. She was wearing...a hamburger. It was a giant, foam hamburger costume held up by suspenders that she and her mom had made when she was in elementary school. It. Was. Awesome. Of course, being the vegetarian that she was, she quickly corrected me and let me know that the patty was actually TVP (textured vegetable protein). I kinda knew after that, this girl needed to be my friend. And we've been friends ever since.

My clamming partners, Mera and Milo
Mera, along with her husband Chester, are easily some of my biggest fans in the kitchen. I love cooking for them, because they love to eat and love good food. About a month ago, Mera and I spent a weekend at her Halibut Cove cabin where we engaged in one of my favorite pastimes: digging for butter clams.

Now, if you talk to Mera, she will tell you that I have an obsession with digging for clams as well as eating record-breaking quantities of them. NOT TRUE. I simply like clams an awful lot. Ok, perhaps to an unhealthy degree. But like I tell my Dad when ever he looks in my closet and his jaw drops at the number of shoes I've acquired in my lifetime: isn't it a healthier obsession than, say, drug addiction? I mean, who can argue with that, right?

A beautiful bucket of Halibut Cove steamers!
First, you start with a bucket of fresh clams. Best if dug up that day, but also delicious from the local grocery store. If you harvested them from your local beach like we did, fill the bucket with sea water, sprinkle in some cornmeal, and let the clams filter.

Next, if freshly dug- you have to scrub the hell out of them. I've rubbed my fingers raw on more than one occasion scrubbing clams at the cabin. Mera really takes one for the team on this effort, as her usual portion is exactly ONE clam. (Another reason why we're friends- I don't have to share.)

Oops, don't forget the garlic!
Assemble your ingredients- butter, several cloves of garlic, lemon, dry white wine, heavy cream, and parsley.

First, pour yourself a glass of the white wine and have a little fun in the kitchen.  Second, melt one or two tablespoons in a large sauté pan or dutch oven over medium heat. As soon as that's mostly melted, add the chopped garlic and let it cook for about 30 seconds or so- don't let it brown! Add a cup of white wine the juice of half a lemon and bring it to a simmer- this is your flavorful steaming liquid. I usually don't add salt at this point, because often times the clams are pretty salty. I usually wait until the end to season the broth (which will be used for dipping bread, of course!)

Once simmering, add the clams one at a time (I don't dump them in, because often there's residual sand at the bottom of the bowl). If the addition of the clams drops the temperature of the steaming liquid, turn the dial up a smidge to medium-high heat. Cover, preferably with a glass lid so you can peek on them. Clams open up fast, so as soon as you see one open, take it out and remove it to your serving bowl. Nothing tastes worse than an overcooked clam!


Once all of the clams are open and removed to the serving bowl, add the heavy cream and parsley to the pan and taste for seasoning. Add salt if needed, then remove from the heat and pour the liquid over the clams.

Make sure you have a loaf of crusty bread on hand to mop up all that delicious clammy liquid.  Pour yourself another glass of wine.  And then, eat up. Eat those clams like ITS YOUR JOB. At least, that's what I do!


Halibut Cove Steamers

30-35 small butter clams, scrubbed well
1-2 T butter
4-5 cloves garlic, chopped
3/4 c. dry white wine
juice from half a lemon
1/4 c. heavy cream
1/4 c. parsley


Our beautiful dinner spread!
1. Add butter to a large sauté pan or dutch oven over medium heat. Once melted, add the chopped garlic and cook for about 30 seconds. Don't brown it! Add wine and lemon juice and bring to a simmer.


2. Add clams to the pot, cover and let simmer. As the clams open, remove to serving bowl.


3. Once all clams are cooked, add heavy cream and parsley to liquid in pot. Check for seasoning, and add salt if necessary. Pour liquid over clams and serve with a large piece of crusty bread to mop up all the yummy clammy juices.


Enjoy! xo H


Thursday, August 4, 2011

An Oldie But Goodie: Muffins That Taste Like Donuts

As they say, old friends are the best friends.  And sometimes, old recipes are the best recipes.  This recipe is one of the oldest in my arsenal.  It was 1988, we were 5th graders at Weller Elementary (once a Weller Whale, always a Weller Whale!) and we were gathered at my friend Sarah's house for a sleepover.  This is as good as it gets for a 5th grader:  there is no fun like the fun you have at a sleepover with your best friends.  We stayed up until the early hours of the morning discussing the important topics of the day- NKOTB, Technicolor shirts, and the soundtrack to the movie "Cocktail" (I was obsessed).  When we finally woke up, bleary-eyed and clearly suffering from our late-night gigglefest, Sarah's mom Jackie had these delicious muffins waiting for us.  I loved these tasty little treats, and at 10 years old I sat down at the kitchen counter and wrote down the recipe.  23 years later, I still have it.


There's nothing fancy about these muffins.  It's a simple recipe for a muffin scented with a hint of nutmeg, dipped in melted butter while still hot from the oven, and then rolled around in a cinnamon-sugar mix.  A muffin.  Dipped in butter.  Topped with cinnamon and sugar.  WHAT IS NOT TO LOVE?!?!  And they really do taste like donuts!

(This one's for you, Nikki!)


Muffins That Taste Like Donuts

For the muffins:
1 3/4 c. all-purpose flower
1 1/2 t. baking powder
1/2 t. salt
1/2 t. nutmeg (or less-fresh ground if you have it)
1/4 t. cinnamon
1/3 c. vegetable oil
3/4 c. granulated sugar
1 egg
3/4 c. milk

For the muffin top (hehe!):
1/2 c. melted butter
3/4 c. granulated sugar
1 t. cinnamon

1. Line a muffin tin with liners, or spray each generously with cooking spray.  In one bowl, whisk together flour, baking powder, salt, nutmeg and cinnamon. In another bowl, combine the oil, sugar, egg and milk.

2. Add liquid ingredients to the dry and stir only to combine (do not overmix or your muffins will be tough little hockey pucks!)

3. Fill each muffin tin about 3/4 full (you should have 12 muffins, give or take).*  Bake at 350 degrees for 20-25 minutes, or until lightly brown on top and an inserted toothpick comes out clean.  Shake the muffins out immediately and while still hot, dip in the melted butter, then into the cinnamon-sugar mix. 

4. Devour.  These muffins are best served warm with milk!

*Note:


Enjoy! xo H