Tuesday, December 31, 2013

pumpkin spice muffins


For Christmas this year, my adorable nieces in Fairbanks gave me the holiday death plague.  Complete with hacking cough, sore throat, congestion...you get the idea.  I feel like death warmed over.  A pair of socks or some homemade drawing with macaroni glued to it would have sufficed.  Instead, I have the voice of a 6-pack-a-day smoker and the feeling of a hangover without the joy of the previous night's festivities.  Merry Christmas, Auntie Heidi!

So here I lay on my couch, with the Food Network buzzing in the background.  My girl Ina Garten is making some delicious Italian Feast of roast fish with polenta and celery salad.  The plague has done nothing to curb my appetite (DAMN IT) and all I want to do is reach through the television and have a little taste for myself.

A staycation for one seems to be what the doctor's ordered.  Even Milo agrees.  He's barely moved from his perch atop the couch all day. 

In my delirious, sick-y state I decided I needed to bake something.  I KNOW, I KNOW.  I'm a terrible baker.  Recipe exactness is for the weak and timid.  Which is my excuse for why nearly every cake I've ever made looks more like a pancake than an actual cake.  But I've really wanted to make this holiday muffin recipe I received in the mail, and my house is still full of Christmas decorations so it still feels very festive here on the West side of Anchorage.  And therefore, I made muffins.  Which turned out super delicious, and may even be deceptively healthy.  So therefore, Happy New Year's resolution to you, too!  (Just ignore the enormous amount of sugar in them.) 
 
Here's to a happy, healthy, delicious 2014!!!


Pumpkin Spice Muffins
(Adapted from eatliverun.com)
 
2 c. whole wheat pastry flour
1/2 t. baking powder
1 t. baking soda
3/4 t. salt
1 t. cinnamon
1/4 t. nutmeg
1/4 t. ground cloves
1/4 t. ground ginger
2 eggs
1 1/4 c. brown sugar
1/2 c. canola oil
1/2 can (or 7.5 oz.) pumpkin puree
1/2 c. warm water
 
For streusel topping:
1/2 c. old fashioned oats
1/2 c. brown sugar
scant 1/4 c. flour
1/4 t. salt
1/4 t. cinnamon
3 T. cold unsalted butter, cubed
 
(1) Preheat the oven to 375 degrees.  Spray a 12-muffin tin with non-stick cooking spray, or use cute polka-dot liners like I did. 

(2) Whisk the flour, baking powder, baking soda, salt, and spices in a large bowl or mixer with the whisk attachment.

(3) In another bowl, whisk together the eggs, brown sugar, oil, pumpkin, and water.

(4) Add the wet ingredients to the dry and mix until JUST blended (don't overmix!)

(5) Fill the muffin tins 3/4 of the way with batter.

(6) Mix all of the streusel ingredients except for the butter.  Add the butter after the other ingredients are fully incorporated, and use your fingers to crumble up the butter into the mix until only small pieces of butter remain.  Top each muffin with a small handful of streusel.

(7) Bake for 30-35 minutes, checking after 30 minutes, until a toothpick inserted in the center comes out clean.

Enjoy!
xo H

Monday, December 2, 2013

perfect hashed browns


It's no secret that my favorite meal is breakfast.  It incorporates all of my very favorite things: eggs (I eat them any way I can get them), some sort of delectable pork product (sausage? ham? bacon? do I have to choose?), a carbo-rific component, and OJ. 
 
The problem with breakfast, however, is that it implies an "early morning" requirement. 
 
You see, I'm good at so many things.  Cooking, online shopping, making shapes with Play-Doh.  Waking up in the morning?  Ugh.  I'm what you call "morning-impaired." 
 
But BRUNCH?!  Oh, yeah.  Brunch I can do.  To me, brunch is basically breakfast after you can sleep in for a bit.  Now that's my kind of meal.
 
If it's breakfast for one, I'm usually a poached-egg-on-buttery-toast kind of girl, just like my Mom.  But when friends or family come over, I kick it up a notch.  Lately, I've been attempting to use my bounty of Alaskan potatoes, and recently whipped up this batch of perfect hashed browns.  I've tried a few different methods- pre-heating the potatoes in the microwave, roasting everything in the oven.  But I find that nothing produces a perfectly crisp, browned pile of potatoes like butter, a little patience, and a cast iron skillet.

If you're using a thin-skinned waxy potato like I did, don't even bother peeling them.  I rarely peel my potatoes.  I usually tell friends it's because there are so many good vitamins in the skin, and I think that's true.  But the real truth is I'm just too lazy to bother.  A good scrubbing is all they really need.


Perfect Hashed Browns

(Serves about 4.  Adapted from Barefoot Contessa)

3 tablespoons unsalted butter
1 1/2 pounds small potatoes, such as Yukon Gold, purple, or German Butterball
1 large onion, diced
2 teaspoons kosher salt
freshly ground black pepper
2-3 sprigs fresh thyme (optional)


(1) Melt the butter over medium heat in a large cast iron skillet.

(2) Add the onions, potatoes, salt, and pepper and cook for 20-25 minutes, flipping occasionally with a spatula.  Add the thyme towards the end of the cooking and serve hot.

Enjoy!
xo H

Friday, November 22, 2013

maple and rosemary roasted sweet potatoes & squash (and a story about a turkey)


Ah, Thanksgiving.  A time for friends and family to gather around the table in love and friendship, so that we may all sit down, say grace, and stuff our faces full of delicious foods drenched in butter and cream. 
 
Thanksgiving: the greatest holiday of them all.
 
At this point, what I really should tell you about is this delectable little recipe I am sharing with you for your holiday table.  Perfect for Thanksgiving, Christmas, or any time during this chilly winter season.  Acorn squash and sweet potatoes mingle together with maple syrup and a hint of rosemary for a fantastic, comforting side dish.
 
But what I really want to tell you about is how I'm getting a turkey on a plane for Thanksgiving.
 
HUH?!
 
You see, I'm not one for simple, pain-free holidays.  They're just too easy.  I like complex, anxiety-inducing holidays that require multiple phone calls, web searches, a Facebook blast, and pleading for favors from family and friends.  This all started because my bleeding, YUP-i-fied heart has watched far too many documentaries and read far too many books about the horrors of commercial poultry factories.  To ease the burden on my conscience, I thought I would simply buy a local turkey for the Big Day.  Easy-peasy, right?
 
WRONG, PEOPLE.  Soooo wrong.  Buying a local turkey in Alaska is about as easy as ordering ice cream in the middle of the desert.  Local turkey purveyors Triple D Farms, made (in)famous in this fantastic gem of a video by She Who Shall Not Be Named, closed down in 2011.  A fairly extensive search on the web and several phone calls around the Anchorage/Mat-Su Valley area turned up ZERO turkeys for my table. 
 
I told myself, "Heidi, suck it up.  Just be like everyone else and go to the store and buy a damn turkey."  I mean, they're perfectly decent turkeys!  I grew up with them, and loved my turkey dinner at every Thanksgiving table.  So I went to my favorite wholesale store (need a turkey and a generator and your tires rotated?), picked up an "organic" turkey, placed it in my cart and felt a little better.  As I made my way to the front of the store, however, panic overcame me.
 
How exactly were these turkeys raised?  Did they live a good life, running around with their brothers and sisters, left to roam free on grassy fields?  A Google search of the company brand turned up exactly what I suspected: it was wholly-owned by one of the big, bad corporate poultry factories.  My heart began to bleed again.  I turned my cart around, traveled back to the cooler, and placed the frozen bird back into its resting place. 
 
Having already given up on my local turkey, I called a locally-owned market that sells farm-raised turkeys for $85,700.00/pound.  From the way they pitch it, these pasture-raised, spa-treated, college educated birds had a life in California better than most of us ever dreamed of.  I swallowed the price tag and placed my order.

AND THEN IT HAPPENED.

My friend Renee texted me later that same day to tell me a friend of hers raises turkeys in Kenai for his family.  And he had a SPARE he was willing to sell me.  I was elated!  The only hitch?

It's in Kenai.  And I'm in Anchorage.  A 150 mile problem.

A few texts, a Facebook blast, and a couple phone calls later, I learn that my friend Mike is flying home from Kenai TODAY.  I called him and simply asked if he'd do me a favor.

Mike: "Sure.  What's up?"

Me: "Uh.  This might sound a little weird.  Can you bring something home for me on the plane?"

Mike:  "I think so, if it fits in my carry-on.  What is it?"

I paused.

Me: "A frozen, 20-pound turkey."

Mike: "A FROZEN TWENTY POUND TURKEY?!?!?!"

When he said it like that, it really did sound a little crazy.

Luckily, Mike loves me.  And my crazy antics. 
 
So in about two hours, Mike is going to board a plane with a frozen 20-pound, Alaska-raised turkey.  YIPEE!!!!!!!!!!!!!!!

How in the world am I going to top this next year? :)


Maple and Rosemary Roasted Sweet Potatoes & Squash
(Serves 4-6)
 
1 acorn squash, halved and seeds scooped, and sliced into 10-12 wedges (leaving the skin on- it’s edible!)
1 sweet potato, sliced crosswise and into 8-10 wedges
2-3 tablespoons olive oil
1 ½ teaspoons kosher salt
Several grinds of fresh pepper
2 tablespoons real maple syrup
1 tablespoon chopped fresh rosemary
2 tablespoons butter
 
(1)    Preheat the oven to 425 degrees.
 
(2)    Place the squash and potatoes on a shallow baking sheet.  Toss with the olive oil, salt, pepper, syrup, and rosemary.  Arrange in a single layer.
 
(3)    Dollop the veggies with the butter (either by breaking it up with your fingers or sliced into small cubes with a knife).
 
(4)    Bake for 30-40 minutes, flipping once halfway through, until golden brown. 

Enjoy!
xo H
 

Thursday, October 31, 2013

salty sisters' roasted alaska spot prawns with fennel, olives, and oranges (COOKOFF WINNER!)


There comes a time in every woman's life when her grit, determination, and willpower are put to the test.  A time when resolve and fortitude are challenged in a epic battle of skill, creativity, and knowledge.
 
(Bet you're thinking that I'm talking about the time I took the bar.  Yeah, that totally sucked-- worse than what I'm actually talking about, but no one wants to hear me complain about it for the 800 thousandth time.)
 
I'm talking about the Alaska Sustainable Seafood Cookoff!  Sponsored by the Alaska Food Policy Council, the Cookoff was held on Thursday, October 24th at the newly-opened Downtown Soup Kitchen in Anchorage. 
 
The Challenge:  Four duos battle it out in one hour to produce the best seafood dish for 5 local foodie judges.  Think Iron Chef meets Chopped.  (And if you don't understand these two AWESOME reality show references, then, well...nevermind.)
 
The Catch:  The contestants don't know what they're actually cooking until the competition begins!

We must have been crazy.  And we are, a little.

Thanks to Jennifer McGovern for her excellent photography!
 
 
So I did what I always do when I'm asked to compete in an Iron Chef-like local seafood cookoff at a soup kitchen...I teamed up with my friend Kate Consenstein.  We called ourselves the "Salty Sisters."  And we ROCKED this competition.  LIKE.  IT.  WAS.  OUR.  JOB.
 
While we were allowed to bring our own tools and three "secret" ingredients along with us to the event, we didn't know what we were actually cooking until Rob Kineen of Fresh49 yelled "GO!" revealing we had one hour to cook...Alaska spot prawns.
 
Excellent.


Before the competition, Kate and I were at loggerheads over our strategy.  Should we panko crust our seafood?  Pan-sear it?  Kate insisted that if we get salmon, we leave the skin on.  I insisted that if we get salmon, we take the skin off. 

We were off to a shaky start.

And both of us, with our strong opinions and even stronger personalities, worried if our friendship would survive the challenge.

People, it didn't just survive.  It THRIVED.  Turns out, we make a perfect competitive match. 

Kate and I were both a bundle of nerves before the competition began.  My hands were sweaty.  Kate's stomach was turning.  This was supposed to be FUN?!  Why do we torture ourselves with this kind of FUN?!  But as soon as the clock started running, the nerves simply disappeared and we became seafood-cooking machines.  I took care of the produce while Kate took care of the protein.  The oranges were perfectly segmented.  The fennel was neatly shaved on my mandolin (best birthday present my brother's ever gotten me!)  The shrimp was peeled with precision, with the tails left perfectly intact.  And more importantly, they were cooked to PERFECTION.  Just barely opaque all the way through.

As the clock began winding down, pans were clanging, food was flying, and people were running into each other in the kitchen.  We were all down to the wire.


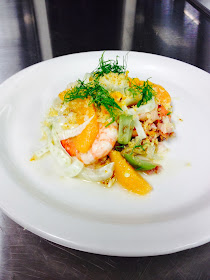
After tasting my roasted fennel, I worried I over-seasoned it.  It had a sharp, salty bite to it.  But there was no time to fix it, and Kate and I ultimately decided it should make it on the plate.  It was a good decision.  Turns out, the contrast of flavors and textures between the roasted and raw fennel, coupled with the sweetness of the oranges and briny olives, was an incredible combination.  The fresh Alaska spot prawns, after mingling with the chopped bacon in the oven, were salty-sweet and utterly succulent.  Yet Kate and I both agree that the perfect finishing touch came from the buttery toasted citrus breadcrumbs, which added that crunchy texture that we all crave.

And wouldn't ya know it...we won. :)

As Kate said, Viva Sustainable Seafood!


Roasted Alaska Spot Prawns with Fennel, Orange, and Castelvetrano Olives
and Toasted Citrus Breadcrumbs
(Courtesy of the Salty Sisters: Heidi & Kate!)

30 Alaska spot prawns, peeled with tails intact
1 shallot, thinly sliced
4 slices of bacon, finely diced
3 fennel bulbs, cored and halved lengthwise
3 oranges, peeled and segmented (also known as “supreming”), plus their juice
20 Castelvetrano (or other green) olives, pitted and halved
1 tablespoon fresh lemon juice
1-2 teaspoons extra virgin olive oil
Kosher salt and freshly ground pepper, to taste
1 cup panko breadcrumbs
2 tablespoons butter
zest of one orange
fennel fronds, for garnish

Serves 4 

(1) Preheat the oven to 425 degrees. 

(2) On the medium thickness setting of your mandolin (or with a sharp knife), slice one fennel bulb crosswise about 1/4 inch thick.  Toss the fennel on a baking sheet with 1-2 teaspoons of olive oil and season with salt and pepper.  Arrange in one layer and bake for 20-30 minutes until soft and golden. 

(3) Place orange segments and their juice into a bowl along with the olives.  On the thinnest setting of your mandolin slicer (or by using a very sharp knife) thinly slice two fennel bulbs crosswise, being careful to reserve the fronds as garnish.  Add sliced fennel to the bowl, along with the lemon juice and 1-2 teaspoons of olive oil.  Season with salt and freshly ground pepper to taste and toss well. 

(4) Cook diced bacon on medium-high heat in a large cast iron skillet. When bacon is partially cooked and some bacon fat has rendered, add 1 tablespoon of butter and add shallots. Once shallots have cooked to translucency, remove from heat. Layer shrimp over shallots and bacon and season with salt and pepper.  Bake at 425 until the shrimp just barely become opaque, about 5-7 minutes. 

(5) Mix the bread crumbs with 1 teaspoon of orange zest, a pinch of salt, and a few grinds of pepper.  In a large skillet on medium-high heat, melt 1 tablespoon of butter and add the bread crumbs to the skillet.  Toss the crumbs around in the skillet until the breadcrumbs appear toasted, about 5-7 minutes.

6) To serve, place the roasted fennel on the bottom of the plate.  Top with the shrimp and shallot/bacon mixture.  Place the salad of orange, fennel, and olives on top of the shrimp along with a drizzle of the juices.  Sprinkle with the seasoned breadcrumbs, additional orange zest, and fennel fronds. 
Enjoy!
xo H & K

Thursday, September 12, 2013

wild alaska salmon with chimichurri & roasted root vegetables


I'm a bit salmon obsessed of late, and for good reason.  You see, after an extremely successful fishing trip in Valdez's Prince William Sound, I'm a bit salmon-heavy at my house.  And frankly, that's putting it lightly.  It comes down to this: if I don't eat all this salmon, I can't fit anything else in my freezer.  No ice cream.  No frozen pizza (Newman's Own Pepperoni- my favorite!)  None of those frozen balls of cookie dough I buy from every kid's fundraiser (delicious frozen little balls of dough...why bother baking them?) And no room for any wild Alaska game that I beg, borrow, and steal from friends and coworkers to round out my food supply for the winter.

Yes, I KNOW there's a Fred Meyers around the corner from my house.  That's not the point. 

I just like having a lot of food IN my house.  It's hard-wired in my DNA.


So when my friend David from Alaska Public Media contacted me about another interview for public radio, I knew exactly what to make.  Our conversation went something like this:

David: "I'm thinking of a fall theme.  How about soup?"

Heidi: "Great!  But we're going to have salmon."

David: "Pot roast is great, too.  But I love soup."

Heidi:  "Awesome.  Salmon it is!"

Good thing David's a good sport, and loves salmon. 


We traveled to a local farmers' market to gather up beautiful, freshly-harvested vegetables for roasting along with the salmon.  The market was spotted with jewel-colored carrots, beets, and potatoes.  I said to David, "You eat with your eyes first!" and gathered up my colorful crop.

Back at my house, I scrubbed, sliced, and seasoned away in my tiny little kitchen, while chatting with David and cursing at Milo for constantly squeaking his toy at David's feet.  By the time we finally sat down to eat what I had concocted, I had forgotten the mic was even there.  Three hours after we meet at the farmer's market, I sent David home with dinner for his wife. 

It was really fun.

And you know what's the kicker?  This just may be one of the best salmon meals I've ever made.  The salmon and the veggies are delicious on their own, but the chimichurri sauce added an intense burst of flavor, while also tying the entire dish together.  And for me, nothing says fall like a pile of sweet, tender, carmelized roasted root vegetables, at the peak of their freshness when the thermostat starts dipping and the leaves begin to fall.   

(You can listen to Chena Girl on the radio here!)


Alaska Salmon with Chimichurri Sauce

Serves 4

For the chimichurri sauce:
(Adapted from Simply Recipes)

1 cup (packed) fresh flat leaf Italian parsley, stems removed
3-4 garlic cloves
2 tablespoons fresh Oregano leaves (or 1 teaspoon dried)
1/2 cup olive oil
2 tablespoons white or red wine vinegar
1 teaspoon salt
1/4 teaspoon red pepper flakes
a few grinds of black pepper
 

For the salmon:
(Adapted from Barefoot Contessa)

Four wild Alaskan salmon fillets, skin and pin bones removed (about 4-6 ounces each)
olive oil
kosher salt
a few grinds of pepper

Preheat the oven to 425 degrees.

Place all ingredients for the chimichurri sauce in a food processor and pulse until just combined- you still want the sauce to retain a "chunky" look.  If you don't have a food processor, finely mince the herbs and garlic and toss with the other ingredients.  Set aside while salmon is cooking.

Heat a dry oven-proof nonstick skillet over medium-high heat.  Rub each of the salmon fillets with olive oil and sprinkle liberally with salt and pepper.  When the pan is hot, place the salmon presentation-side down (usually the top of the fillet) and let sear without moving them for two minutes.  Turn the fillets over and place the pan in the oven for 4-5 minutes, or until the salmon is cooked but still a little pink inside.  DO NOT OVERCOOK THE SALMON.  Best to err on the side of rare!

Top each salmon fillet with a little chimichurri sauce and serve.

Roasted Root Vegetables

Serves 4

8-10 small carrots
2 medium beets of any variety, peeled and sliced into 8 wedges
4-6 small red and yellow waxy potatoes

This recipe is more of a method than an exact science.  You can use any combination of root vegetables.  I particularly love using sweet potatoes and parsnips, and will often throw in butternut squash as well. 

Start by preheating your oven to 425 degrees. 

Scrub veggies well.  Peel the beets and slice into 8 wedges each.  Leave the skins of the carrots and potatoes on if you prefer- I certainly do.  Cut stems and roots of carrots and leave whole if they are small, cut in half if they are big.  Cut potatoes into rough 1 inch cubes. 

Place all the veggies on a baking sheet.  Make sure you only have enough veggies to cover a single layer without overlap- this way the veggies roast instead of steam. Toss all veggies with one to two tablespoons of olive oil, a heavy pinch of kosher salt (about 1/2 teaspoon) and several grinds of fresh black pepper.  Bake for 30-35 minutes, turning once about halfway through.  Finish with a final dash of salt (I love sel gris!) if you prefer, and serve HOT!

Enjoy!
xo H


Friday, August 23, 2013

wild alaska salmon quiche


There comes a time in every woman's life where they sort of just hit a wall.  For me, it happened this week.  The wall came in the form of: several bills from house projects completed over the summer, an unexpected brake replacement on my Jeep, a hot water heater on the fritz, and just for good measure, a boiler that decided to take a little break.  As an Alaskan who enjoys the warmth of my cozy home, all I can say is THANK GOD IT'S NOT WINTER.
 
Since I'm hemorrhaging money these days, I feel like channeling the batty guy on that old PBS show "The Frugal Gourmet" and do my absolute very best this month to make delicious, healthy meals using only the contents of my pantry, fridge and freezer.   
 
This sounds so totally noble and resourceful of me, right?!  Riiiiiight.  Well, those who know me best know that this is not an entirely difficult task for me.  I won't even post a picture of my pantry, my fridge, or my freezer (um...both my little freezer and my deep freeze.  Yikes).  Because they are all totally FULL.  Like, I'm not kidding full.  Like, I-had-to-put-a-can-of-paint-on-top-of-my-freezer-to-make-sure-it-closes-full.  Yes, there is actually a can of Ralph Lauren paint on top of my deep freeze right now.  Granted, I just got back from an epic fishing trip in Valdez with my Dad and friends Stephanie and Marika where we slayed the silver salmon like it was our job
 
Still, I am 100% prepared for a nuclear holocaust.


In an effort to use up last year's crop of canned salmon, I dug out this trusty recipe from my archives.  The original recipe for this quiche came from my dear friend Shirley Jewett.  She was the mom we all wanted to wake up to on Saturday morning for homemade cinnamon rolls and coffee cake.  She is an incredible cook and baker!  Shirley's recipe includes steps for a homemade pie crust, but I already had a ready-made one on hand and was feeling rather lazy.  So I skipped that step.
 
I had nearly everything on hand for this quiche: canned salmon, eggs, pie crust, herbs...it all came together in a pinch.  I did substitute Greek yogurt for the sour cream it typically calls for, but I was thrilled with the results.  The quiche still came out perfectly rich and moist while trimming a little extra fat from the recipe. 
 
I realize this calls for a lot of canned salmon.  I think I used two large jars for it.  Alaskans often have this in abundance in our pantries.  But if you don't have canned salmon, you could substitute baked or poached salmon and add a little water, extra sour cream/yogurt, or mayo to the quiche mix to make up for the reserved canned salmon juices. 


Wild Alaska Salmon Quiche
 
(Serves 6 hearty Alaskan appetites, maybe 8 lower-48 appetites.  Ha!)

1 pound of canned salmon, drained but reserve the liquid!
1 cup sour cream or plain Greek yogurt (nonfat works too!)
1/2 cup shredded cheddar cheese (I used Tillamook Extra Sharp White)
1/2 teaspoon dried dill (or 1/2 tablespoon fresh dill if you have it)
2 tablespoons chopped fresh parsley
3 eggs, beaten
1/4 cup mayonnaise
1 tablespoon grated onion
3 drops (or more) of your favorite hot pepper sauce
1/2 teaspoon salt
several grinds of fresh pepper
1 ready-made pie crust

(1) Preheat the oven to 325 degrees.  Drain the salmon, but reserve the liquid.  Add enough water to the liquid to make 1/2 cup.

(2) Flake the salmon, and add to a bowl with all the rest of the ingredients except the crust.

(3) Place the pie crust on a cookie sheet.  Then pour the quiche ingredients into the crust.  Bake for 45-50 minutes until the center is firm. 
 
Enjoy!
xo H


Friday, July 26, 2013

peanut butter banana bread


One thing I've always been proud of is that I'm the least picky eater I know.  This is totally true.  Even as a little kid, I was constantly willing to taste things that others wouldn't.  Sushi in elementary school, Brussels sprouts back when they weren't cool, and buckets of steamed clams that my Mom, my sister and I would chow down on no time.  In fact, we're a whole family of adventurous eaters!  It's one of my favorite things about my clan.
 
So how on Earth did I develop a distaste for bananas?  To this day, it remains a mystery.
 
Actually, the real mystery is how I developed a distaste for bananas in their natural state, while still LOVING banana bread.  Riddle me that, will you?
 
This is a recipe for one of the baking world's greatest inventions:  the quick bread.  For those of us that tend to stray from the reservation when it comes to cooking-- i.e.,  a little of this, a pinch of that...hey, what's that measuring spoon for??-- this recipe is very easy and forgiving.  The banana plays second fiddle to the peanut butter, adding a hint of banana flavor and lots of moisture.  Perfect for the banana-impaired.  And how can you go wrong by adding a few chocolate chips to the mix? 
 
I made this bread before heading off to a weekend cabin adventure near Talkeetna, Alaska and it was enjoyed for breakfast, a sweet treat at lunch, and dessert after dinner.  Note to self for future Alaska wilderness adventures: quick breads are the perfect snack to bring along!
 
Just make sure your bananas are nice and ripe.  I mean RIPE ripe.  Mine were almost black- completely soft and sweet and at their peak banana bread life stage.  This makes for the BEST bread.


Peanut Butter Banana Bread
 
(thanks to my friend Cheryl for the recipe!)
 
2 1/2 cups all-purpose flour
1/2 cup granulated sugar
1/2 cup brown sugar, packed
1 tablespoon baking powder
3/4 teaspoon salt
1/4 teaspoon ground cinnamon
2 very ripe bananas, mashed (about 1 cup)
1 cup milk
3/4 cup peanut butter (smooth or chunky- whatever you prefer)
3 tablespoons vegetable oil
1 teaspoon vanilla extract
1 egg, slightly beaten
1 cup semi-sweet chocolate chips
 
1. Preheat the oven to 350 degrees.  Grease two 8x4x2 inch regular loaf pans.  Set aside.
 
2. With a whisk, stir together flour, sugars, baking powder, salt and cinnamon.  Set aside.
 
3. In a mixer, combine bananas, milk, peanut butter, oil, vanilla, and the egg.  Add the flour mixture, mixing just enough to combine (don't overmix it, or you'll end up with a tougher bread!)  Stir in the chocolate chips.
 
4.  Divide the batter evenly between the two prepared loaf pans.  Bake for 45-50 minutes or until a toothpick or small knife inserted in the center comes out clean.  Cool in pans for 10 minutes, then remove loaves from pans and cool on a wire rack completely.
 
Enjoy!
xo H


Wednesday, June 12, 2013

perfect skillet chicken


There is something in your kitchen that you've been neglecting.  Perhaps you received it as a wedding present.  Or its been passed down to you from your grandmother's grandmother's grandmother.  Or maybe you've been living without one all this time.

The cast iron skillet.

If you have one...why is it sitting there, sad and lonely, collecting dust along with your waffle cone maker, your Hawaiian ice shaver (my Mom has had one of these sitting on her kitchen counter for like 15 years!), and your quesadilla maker?  The latter three you can shuffle off to good will.  But your cast iron skillet, you must start using immediately!

I only say this because I'm guilty as charged.  I actually didn't even own one until two years ago, and mostly because the idea of "seasoning" a skillet freaked me out until I watched someone do it on TV and realized how totally easy it is (check out just how simple it is here).  Seasoning a cast iron skillet simply means baking on a layer of oil (or other fat) to protect the surface of the pan and provide a cooking surface.  Cast iron is fantastic because it conducts heat so evenly, and is particularly well for giving any kind of meat a delicious, crispy golden exterior.  But it's also great for skillet potatoes, pan-frying vegetables, or baking a rustic (read: easy) cornmeal cake like this one that I love
 
Case in point: these beautiful chicken thighs.  My mouth waters just looking at this photo!
 
If you follow this recipe, you can't fail.  Truly- it's as easy as that!  I made them for my friend Ann, who practically melted with satisfaction when she took her first bite and then said something right on point: "When you eat this, who needs fried chicken?!"
 
Exactly.  The skin is incredibly crispy, and the key is to season your chicken well with salt and pepper.  Try it.  Love it. 
 
(Also, it is super delicious cold at 11:30 p.m.  Don't ask how I know, I just do.)


Perfect Skillet Chicken Thighs

(Adapted from Bon Appetit)

6 bone-in, skin-on chicken thighs
Kosher salt and freshly ground pepper
1 tablespoon vegetable oil

Preheat the oven to 475 degrees.  Pat the chicken with paper towels and season both sides liberally with salt and pepper.  Heat the oil in a 12 inch cast iron skillet over high heat until hot but not smoking.  Place the chicken thighs skin side down in the skillet and cook for 2 minutes.  Turn down the head to medium-high and move the chicken around in the pan to make sure they're cooking evenly and not hitting "hot spots" in the pan.  Cook until the skin is a golden brown, roughly 12 minutes.

At this point, put the whole skillet in the oven and continue cooking the chicken skin side down for another 13 minutes.  Flip the chicken and cook an additional 5 minutes.  Remove the chicken to a platter and let it rest for another 5 minutes before serving.  So delicious!


Enjoy!
xo H


Sunday, April 28, 2013

squash mac & cheese


I LOVE THIS DISH.  But I seriously fretted about what to call it.  Because it's a lighter mac & cheese, but calling it "light mac & cheese" is such a culinary turnoff.  Might as well tell folks to chew on some saw dust, eh?  "A slimmer mac & cheese" sounds even worse.  "Healthy mac & cheese" means zero people will want to make it, much less eat it.  "Mac & cheese that is just as delicious as regular mac & cheese and you can't even tell it has squash in it!" was just getting pathetic.  I felt desperate.  So I settled on owning up to exactly what it is.  And exactly the right (read: wrong) person called me as soon as I'd typed the title of my post. 
 
Meagan.  My beloved friend who abandoned me for Washington, D.C. several years ago and who I've been attempting to coax back home ever since.  She called to catch me up on her weekly goings on, as we do most weekends. 
 
"What are you doing?" she asks.
 
"I'm working on a new post," I respond.
 
"Oooh!" (She's a Chena Girl cheerleader. LOVE her.) "What's the recipe?" she asks.
 
(SUPER.  Here we go...) "Um...squash mac & cheese???"  I cautiously utter.
 
"EWWW!  Gross.  Who would make that?"
 
SEE?!  SEE WHY I FRETTED ABOUT THE NAME OF THIS RECIPE??!!  Because of the Meagans in the world.


You see, the Meagans of the world don't understand that just because you sneak a little squash in a recipe does NOT meant the recipe is ruined!  I wish I could explain to everyone JUST HOW INCREDIBLY DELICIOUS THIS MACARONI AND CHEESE IS!  Seriously, you can't even taste the squash, and yet it adds a velvety richness to the dish and allows you to cut out nearly half the butter and cheese.  I served it to friends at a dinner party once without telling them it's healthy little secret until they'd devoured the entire casserole.  The proof is in the eating.
 

I take my blog recipes very seriously.  (Ok, I don't take myself very seriously, but I'm totally serious about my food.  Ask anyone who has ever met me, like, ever.)  I only post my favorite recipes here, and this mac & cheese fits the bill.  What I love about it is that you can serve it two ways.  It's perfect right from the stove top (my nieces demolished it when I served it to them, more than any alien orange-y box mac & cheese concoction-- a seriously proud Auntie moment).  Or bake it in a casserole dish topped with buttery breadcrumbs and bake until bubbly and golden.  


So to the Meagans of the world, I say this:  broaden your horizons, and embrace the squash. 

(And to one Meagan in particular:  remember when you totally hated Brussels sprouts?  And I told you that you hadn't had them cooked the right way and you need to try them roasted?  And when you did you loved them and it like totally changed your life forever?

 Yup.  It's like that.)


Squash Mac & Cheese

adapted from Barefoot Contessa

1 pound cavatappi or elbow macaroni
4 cups 2% milk
4 tablespoons (1/2 stick) butter
1/4 cup flour
2 cups shredded gruyere cheese
1 cup shredded extra-sharp cheddar cheese
one 12 ounce package cooked frozen squash, thawed
1 pinch nutmeg (scant 1/4 teaspoon)
1 tablespoon of kosher salt
fresh ground pepper
1 1/2 cups panko breadcrumbs, plus 2 tablespoons butter or olive oil

Preheat the oven to 375 degrees.

Bring a large pot of water to boil.  Add salt to the water (a heavy 5-finger pinch) and a drizzle of vegetable oil.  Add the pasta and cook until al dente (or until there's a little bite to it- just don't cook it to mush).  Drain the pasta.

Heat the milk in a saucepan, but don't boil it.  Melt the butter in a large pot, add the flour, and stir for 2 minutes with a whisk over medium heat.  Add the milk, turn the heat down to medium-low, and whisk until thick and smooth, about 10 minutes (it takes a little longer because you're using less flour and butter).   Be careful to whisk often or the milk can burn on the bottom of the pot.  Once thickened, remove from the heat.
 
Add the cheese, 1 tablespoon of salt, pepper, nutmeg, squash, and macaroni.  Stir until combined.  At this point, it's ready to serve as is!  Or...
 
Butter a 9 x 13 inch casserole dish.  Pour the mixture into the casserole dish.  Melt 2 tablespoons of butter (or substitute 2 tablespoons of olive oil if you prefer) and combine it with the panko breadcrumbs.  Top the mac and cheese with the breadcrumbs.  Bake for 30-35 minutes until bubbly and browned.
 
Enjoy!
xo H