Showing posts with label Italian. Show all posts

Saturday, July 16, 2016

basil & garlic scape pesto


Friends, it's been a glorious summer in Alaska so far!  I've bounced between Juneau and Fairbanks and Anchorage soaking up sunshine, good food, and friendship along the way.  

My first summer living in Juneau has defied my expectations.  For the most part, the weather has been warm and inviting, with the occasional rain shower to keep everything green and lush (and the wild mushroom crop plentiful!) But what has really blown me away is the incredible bounty of wild edibles here in southeast Alaska.  It's AH-MAZING!  With my trusty furry, four-legged sidekick Milo at my side, we've foraged for nettles, devil's club buds, beach asparagus, salmonberries, cloudberries, and most recently the early blueberry crop. I made an fantastic nettle pesto (still have some in the freezer!), pickled the devils club buds and the beach asparagus, and plan to make salmonberry jam as soon as I find the energy.  So far, I've just been munching on the cloudberries, which are tart and creamy.

Clockwise from top left: early southeast Alaska blueberries, beach asparagus, salmonberries, and cloudberries


A bundle of garlic scape
I have a little spare time on this Saturday, which is on of my favorite things in the world.  Last week I made a stop at Rainbow Foods, a terrific local health food store in Juneau, and came across some garlic scapes.  I had no idea I'd be able to find them in Juneau!!  Tastes like garlic, but greener and milder.  I've chopped them up and added them to stir fries before, but recently read that they make a great pesto. I'd also picked up one of those live basil plants last week at the grocery store, so I thought I'd do a combination basil-garlic scape pesto.  It turned out even better than I expected, and so easy to make that I was able to carry on a long-distance phone call with my friend Meagan while throwing it together.  The bright, herbal basil paired with the green garlic scape is a perfect flavor combination.  I had to force myself to stop tasting it repeatedly because its SO GOOD!!

As I type this sentence, I'm swallowing the last yummy mouthful of this pesto on rustic Fire Island Bakery baguette.  Happy Saturday to me!


Basil & Garlic Scape Pesto

(Makes one pint)

2 cups basil leaves
2 tablespoons parsley leaves
1/2 cup chopped garlic scapes
3 garlic cloves, unpeeled
1/2 cup pine nuts
kosher salt and freshly ground pepper
1 cup extra virgin olive oil
1/2 cup grated parmesan cheese

In a smal saucepan over medium heat, toast cloves of garlic until brown spots appear on the outside, about 6-8 minutes.  Once cool, the peel comes off easily.

In that same pan, toast pine nuts over low heat for 4-6 minutes, until golden brown.

Place all ingredients, save for the oil and cheese, in a food processor and pulse 15-20 times until combined.  Slowly pour in oil until incorporated.  Add cheese and pulse a couple times.  

ps...gratuitous picture of Milo(sevic), the little war criminal, on a break from blueberry picking to check out the ocean. <3


Enjoy! xo h


Tuesday, May 3, 2016

wild alaska! stinging nettle pesto

Behold! The delicious, if not tricky, stinging nettle plant.  Tasty little sucker!

It's springtime in Alaska!  Here in Juneau everything has come back to life from the rainy, dreary, soggy wet days of "winter."

(I refuse to acknowledge that we actually had winter when I barely saw traces of snow.  Winter my left toe, Mother Nature.)

I've well-documented my excitement for foraging here on the blog-- PEOPLE, IT'S FREE FOOD-- but Juneau, with its lush rainforests, is a mecca for a forager's soul.  Fiddleheads!  Devil's club buds! Fireweed shoots! Nettles!

Who needs a garden?!


With my trusty sidekick Milo at my side, we set out to gather our bounty.  And by we, I mean Milo explored the wilderness and picked a fight with a whippet while I did all the actual work.  We each have our roles, I suppose. 


Milo: Slacker.
I found an avalanche shoot not too far from where we live and the nettles were in abundance!  Making sure to wear gloves (their sting is not harmful but hurts like a mother), I picked two heaping grocery bags full in no time.

There are so many ways to use nettles.  They just need a quick steam, sauté, or boil to nip the sting.  You can use them in soups, frittatas, or substitute them just about anywhere you use spinach.  They're my favorite spring edible.

With such a huge bounty, I settled on making a pesto.  While there are loads of recipes on the internet for nettle pesto, I settled on this one from Persephone Farm in Washington State.  I loved it!  I will say that I didn't adhere to the recipe entirely.  Perhaps an extra garlic clove and a bit more squeeze of lemon made it into my pesto.  I think it's  best to make the recipe, taste it, and then add to it what you like to please your taste buds.  Maybe you want a little extra parmesan or a dash more of salt?  Go for it!


(And for more information about stinging nettles, check out this page from the Alaska Department of Fish & Game.)

Stinging Nettle Pesto

1/4 pound stinging nettles (weigh them dry!)
1-2 garlic cloves (depending on your taste)
1/2 cup pine nuts
1/2 cup extra-virgin olive oil
2-3 tablespoons fresh lemon juice (or to taste)
1/2 cup freshly grated parmesan cheese
kosher salt and freshly ground black pepper

Toast the pine nuts in a dry skillet over medium-low heat for 4-5 minutes, or until they turn lightly brown (being careful not to burn them like my first batch. Oops). Set aside.

Set a large pot of water to boil.  Gently boil the nettles for 1 minute.  Drain, then place immediately in a large bowl of ice water (this will set the pretty green color and stop the cooking).  Drain in a colander.  Use clean paper towels to squeeze out as much water from the nettles as possible.

Place all ingredients in a food processor, and whir up until smooth.  Adjust ingredients to your liking (I like extra garlic and lemon) and season with salt and pepper to taste.  

Spread on toasted baguette, homemade pizza, or toss with pasta.  This pesto freezes well, too!

Enjoy!

xo h

Tuesday, August 7, 2012

Barley "Risotto" with Pesto and Summer Squash


This weekend, the girls and I had a good ol' fashioned roadtrip. Meagan, Jenna and I piled into my Jeep and headed along the gorgeous Glenn Highway to our friend Kate's wedding near Valdez. The adventure was full of laughter, tears (of laughter), hilarious stories, getting lost, cursing at slow Canadian RV's, and almost running out of gas. No joke. I had to stare at this for roughly five miles:


We almost had to resort to hitchhiking to get to the wedding.  Along the way, we dined on such delicacies as Twizzlers, cheesy puffs, Oreos, sunflower seeds, and Gardetto's (I ate the rye crisps, Meagan ate the rest).  If we hadn't made it to the gas station in the nick of time, and they had found my car abandoned along the side of the road, they would have thought we were a car full of frat boys (I imagine this scene playing out ala Into The Wild, where Jenna, Meagan and I would have left the car behind to live our lives in and of the wilderness, picking berries and spearing fish to survive.  We wouldn't have made it 15 minutes.)

So, when I post a recipe as healthy as this, its important that you know I have a well-balanced nutritional diet.  Balanced in that I eat a healthy dose of junk along with my barley and veggies.

I had a barley risotto at one of my favorite restaurants, Maxine's Fireweed Bistro, not too long ago and I've been itching to try my hand at it ever since.  My friend Marika told me about this delicious pesto risotto she found on her favorite vegan food blog, ThePPK.com, and I decided to adapt it using barley instead.  Often my little "experiments" turn into utter disasters (need I remind anyone about the pork roast debacle of 2008?) but I'm pleased to announce that this one turned out fantastic!  The nuttiness of the barley paired perfectly with the buttery roasted squash and flavorful pesto, and the toasted pine nuts add the right amount of texture to balance out the meal.  Plus it utilizes store-bought pesto and the multitude of squash and zucchini found in every garden in Alaska right now.  It takes a little time for the risotto to cook, but it's easy and the patience pays off!


Barley "Risotto" with Pesto and Squash

Adapted from ThePPK.com


3 small yellow squash, or 2 small zucchini, sliced into thick half moons
6 1/2 cups low sodium chicken broth
1 T. olive oil, plus 1-2 t. for the squash
1 T. butter
1 medium onion, finely chopped
2-3 garlic cloves, minced
2 c. pearl barley, rinsed and drained
3/4 c. store-bought pesto (unless you're feeling particularly industrious, which I wasn't)
salt and fresh ground pepper, to taste
toasted pine nuts


Preheat the oven to 400. 


Bring chicken broth to a simmer in a medium sauce pan, then reduce heat to low to keep warm.  Melt the butter and a tablespoon or so of olive oil in a large, heavy saucepan over medium heat.  Add onion and saute for 5-6 minutes, until transluscent and soft.  (You should add salt at this time, and should season the barley with salt and pepper throughout the cooking process unless your pesto is particularly salty, which mine was, so I didn't even need to add salt.)  Add garlic and saute for 1 minute, until just golden.  Add the barley and stir for 1-2 minutes.

In the meantime, toss squash with a drizzle of olive oil, kosher salt, and ground pepper on a baking sheet.  Bake for 15 minutes or so, turning once, until golden brown.

Ladel about 1 cup of broth to the barley, and stir often until the broth is fully absorbed.  Keep repeating this process until about half of the broth is absorbed.  Then, add half of the pesto and stir.  Continue adding the broth and stirring until the barley is tender but still has a little bite to it.  Once the barley is creamy and tastes to your liking, add the rest of the pesto.  You may not need all of the broth.  Stir in the roasted squash.

Before the risotto is finished, toast the pine nuts in the 400 degree oven on a baking sheet for 5 minutes, or until golden brown.

Top with toasted pine nuts and serve.

Enjoy! xo H

Sunday, June 24, 2012

Pappa al Pomodoro (Tomato & Bread Soup)


It's finally summertime in Alaska.  The grass is green, the birds are chirping, the flowers are blooming...and it lasts, oh, roughly 9 days.  Therefore, we Alaskans have to take advantage of every single second.  Enter two regulars on the Chena Girl blog: Ma and Pa.  I gently suggested (begged and pleaded) that Mom and Dad take a brief sojourn down from Fairbanks to Anchorage to bask in the comfort of my comfortable (teeny) home and assist me (or, make Dad do most of the work) in a few projects around the house.  I told them the forecast looked great (it rained for three days straight) and it was a perfect time to put a fence up on the back end of my property.

It's really a wonder that my parents love me so much.

So Mom and Dad came down last week to spend some time with their granddog, Milo, and to help me put a little sweat equity into my home.  Ok, so Dad put in some sweat equity while I followed him around the backyard trying to act like I was helping when really I just thought he should have some moral support out there.  We all have our roles to play.

Once it was clear to Dad that I was completely useless to him, save for some political small talk and multiple comments about how many of my raspberry bushes he was killing, I went inside to bug Mom and start making dinner.  The previous day, we stopped in at Bell's Nursery near my house to find a few blooms and ended up with a 5 pound bag of tomatoes from their fantastic greenhouse.  So I channeled my inner Italian grandmother and together with my Mom (who could pass as an American-accented Italian grandmother any day of the week and twice on Sunday) whipped up a batch of Pappa al Pomodoro, or Italian Tomato & Bread Soup.

I had this soup once when I visited Italy several years ago in a small village in Tuscany.  It was heavenly!  Silky smooth and utterly delicious, I couldn't believe how much flavor was packed into a soup consisting of basically tomatoes, olive oil, and bread.  After that, I ordered it every time I saw it on the menu.  When I came home to Alaska, I realized I could only truly make this soup during the summer when tomatoes were in season.  This is the closest I've come to those incredible bowls of soup I enjoyed under the Tuscan sun.


First, start by coring the tomatoes and slashing a small cross on the bottom of each with a paring knife like sous chef Kathy did:


Using a slotted spoon, carefully place the tomatoes in a large pot of boiling water for one minute, then remove them to a large bowl of ice water.  The skins will be easy to peel after this process:


Once skinned, slice the tomatoes in half and squeeze out the seeds.  Next, chop them into smaller chunks (or tear them with your bare hands, like Mom did).

After the tomatoes are ready, heat up one 1/2 cup of good-quality olive oil over medium heat in a large, heavy pot and saute the garlic for a minute or two until it is soft but not brown.  (Never let the garlic burn-it turns bitter and ruins the taste of any dish!)  Yes, the soup does require a heavy dose of olive oil, but there are so few ingredients and it's key to the soup's silky-smooth texture. 

**And now a note about "good-quality" olive oil.  I'm sure as soon as you read that, you thought, "What-- does the bottle say good quality on it?  How the hell am I supposed to know what's good quality?!"  At this point, all I can tell you is this: trust your taste buds!  Taste your olive oil!  Dip a little piece of bread in it once you get it home.  If it tastes good to you, then it will probably taste good in your food.  If it tastes sharp, or has an off-taste, then hide it in dishes where it's not the star.  It's true that you often pay for quality, but not always.  However, as a general rule of thumb, never by the cheapest bottle of olive oil you can find.  Because usually it tastes...well, like the cheapest bottle of olive oil you could find.**

Once the garlic is soft, add the tomatoes, basil, a generous amount of salt and pepper, and let it cook over medium heat until the tomatoes fall apart and became more sauce-like (stirring occasionally).

After about 30 to 40 minutes, add torn pieces of rustic bread to the pot.  The recipe I adapted says to remove the crusts, but they don't bother me a bit so I leave them in.  Fill with enough water to cover the bread, and add a few pieces of parmesan cheese rind if you have them (I always try to save mine-- they add great flavor to soup!)


Let the soup simmer for 30-40 minutes, stirring it occasionally so that the tomatoes don't stick to the bottom of the pot.  Taste it frequently, too, adding salt and pepper as needed.  If the tomatoes aren't as ripe, add a few tablespoons of tomato paste to boost the flavor.  I also add a pinch of sugar to balance out the acidity.  Once it's ready, ladle it into big bowls, finish it with a drizzle of olive oil, and add a few torn basil leaves for garnish.  From the humblest of ingredients comes an incredibly comforting meal.

And a brand-spankin' new fence! 


The great thing about this soup is that it's even better reheated the next day.  The flavors develop more fully, similar to my favorite Ribollita soup, although you might need to add a bit more water to get the right consistency.  I also prefer to eat this soup after it's cooled down in the bowl a few minutes, as opposed to piping hot. 


Pappa al Pomodoro


6 lbs. large ripe tomatoes
3/4 cup extra virgin olive oil
5 cloves garlic, peeled and chopped
Leaves from 1 small basil bunch, washed and torn in large pieces
kosher salt and freshly ground pepper, to taste
2 1-lb. loaves day-old course-crumb rustic bread (crusts removed if you like)
1-2 T tomato paste (if tomatoes aren't as ripe, optional)
1-2 pinches of sugar, to taste
parmesan cheese rinds, for flavor (optional)

1.  Cut the core out of the tomatoes, and make a cross incision on the bottom of each.  Plunge the tomatoes in boiling water for one minute (in batches, if necessary) to loosen their skins.  Remove and place tomatoes in a bowl of ice water.  Peel and discard the skins, slice in half and squeeze out and discard seeds.  Chop or tear up the tomatoes into smaller pieces, and put them aside.

2.  Heat 1/2 cup of the oil in a large, heavy pot (like an enameled cast iron one) over medium heat.  Add garlic and saute for 1-2 minutes to soften, but don't let it brown (or it will get bitter).  Add tomatoes and basil (saving some for garnish), and season generously with salt and pepper.  Simmer, stirring occassionally until the tomatoes fall apart and become sauce-like, about 30-40 minutes.

3.  Tear or cut bread into small chunks and add enough water to cover the bread, about 5-6 cups.  Stir occassionally to make sure the tomatoes aren't sticking to the bottom of the pot.  Add remaining 1/2 cup of olive oil.  If you have any leftover parmesan cheese rind, add it to the pot for extra flavor.  Simmer over medium heat until bread and tomatoes fall apart and soup becomes thick and smooth, being sure to check seasoning periodically.  If the soup needs stronger tomato flavor, add a few tablespoons of tomato paste.  If it tastes a bit acidic, add a few pinches of sugar (I almost always do this to any tomato-based dish).  Serve with a drizzle of olive oil and a garnish of basil leaves.


Enjoy!


xo H


Thursday, March 8, 2012

Mushroom Risotto: Creating Mushroom Lovers the World Over


I'm back from my Palm Springs vacation do-over!  If you saw my post in December, you know that it wasn't exactly the vacation of my dreams.  It was, in fact, the vacation of my nightmares. However, I'm happy to report that this vacation was: drug addict / locksmith / hotel hopping / police / alarm installation / back injury free!  My friend Amanda met me at our family's condo and we did California's Coachella Valley properly, which involves (in no particular ranking order):
A coolified Joshua Tree 

(1) Hiking in Joshua Tree National Park (our one redeeming "nature" day, so we didn't feel guilty about the following activities).

(2) SERIOUS outlet shopping.

(3) Picking fruit from trees literally right outside our door and juicing them to make delicious drinks (which may or may not have contained vodka).

(4) Poolside lounging with appropriate beverage (see #3). 


I really did my broken December self proud.

I swung through Oregon on my way home to spend time with my sister Holly, and made a yummy mushroom risotto in my dream kitchen (that sadly my Dad built for Holly by mistake.  We do look an awful lot alike).  I had just made a huge batch of it a couple weeks ago to some pretty rave reviews (my girl Kate's 13-year old stepson had 3 helpings- THE stamp of approval).

Unfortunately, there are a lot of mushroom haters out there.  I pity them.  They really don't know what they're missing. I mean, rarely does someone like a raw mushroom.  Because raw mushrooms kinda suck.  They taste weird, and they're spongy.  But when you coax the flavor out of them, and add some olive oil, a little love and a good dash of Parmesan cheese...well, that's a dish worth sharing.


I think the key to success with this dish is the use of dried porcini mushrooms.  The amount of flavor they add to any dish is incredible, both the rehydrated mushrooms and the porcini "liquid gold" that is created after soaking them.  I put about a cup of them (you don't have to be exact) in a 2-cup glass measuring dish, and fill it with the hottest tap water possible.  Let this sit for about 30-40 minutes while you start prepping the onions and mushrooms.


Bring 8 cups of chicken stock to a simmer on the back of the stove (I usually bring it to a boil, and then turn it down to medium-low).  In the meantime, add a few turns of olive oil in a large pot over medium heat.  Cook the onion for 5-7 minutes, then add the garlic and cook for 1-2 minutes before adding the mushrooms, herbs, and a good pinch of salt and a few grinds of pepper.  It's best to season any food, but especially a risotto, in layers.  So I add salt and pepper at a couple different stages.

Drain the porcinis, pressing out as much of the liquid as possible while reserving the porcini liquid to add to the hot stock pot.  Add the drained porcinis to the mushroom extravaganza. The mushrooms take a little while to cook, but be patient. You want them to cook down until they lose their liquid and start to turn golden.  Sometimes I'll drizzle in a little more olive oil if the pan looks dry (mushrooms are sponges!)  It takes about 15-20 minutes to do it properly.  Then add the rice and cook it for a couple minutes until it is well-coated and turns slightly opaque, making sure to season it with salt and pepper again. Pour in the white wine and cook until the liquid has evaporated.


Time to add a generous ladle full of hot stock (or about 1 cup at a time).  Wait until the rice has drunk up all the liquid before adding another ladle full.  It takes about 3-4 minutes at a time, but it's well worth the patience!


Repeat this process until most of the stock is used up (you may not use all of it) and the rice is firm and creamy, but not mushy.  Taste it several times while you're cooking it and you'll see what I mean.

When the rice seems perfect, turn off the heat and add the Parmesan, peas, and a dollop of butter (the restaurant secret!)  Check for seasoning one last time and add salt and pepper if necessary (cheese is salty, so I usually add that first before checking the seasoning one last time).  Serve it immediately!  You'll make a lover out of any mushroom hater.  And if you don't, then you're dealing with a lost cause and I don't have any advice for those.  I'm a lawyer, not a therapist.


Mushroom Risotto

Adapted from Tyler Florence

3 T (or more) olive oil
1 onion, minced
2 garlic cloves, minced
1 oz. dried porcini mushrooms
1 lb. assorted mushrooms (I used cremini, button, and Oregon chanterelles)
leaves from 3 fresh thyme sprigs
2 T. chopped parsley
2 bay leaves
2 c. Arborio rice
1/2 c. dry white wine (I used Savignon Blanc)
8 cups chicken stock (or vegetable stock if you don't eat animals)
1 c. frozen peas, thawed under cool running water
1 T. butter
1/2 freshly grated Parmesan cheese
(chopped parsley, for garnish)

To rehydrate the porcini mushrooms, put them in a 2 cup glass measuring dish and fill with the hottest tap water.  Let them soak for 30-40 minutes.  In the meantime, bring the chicken stock to a simmer in a large pot.  Place a large, deep pot or skillet over medium heat and drizzle with the olive oil.  Add the onion and saute till transluscent, about 5-7 minutes.  Add the chopped garlic and saute for an additional 1-2 minutes.  Add mushrooms, herbs, a good pinch of salt and a few grinds of pepper.  Saute until the mushrooms lose their liquid and turn golden, about 15-20 minutes.  Once the porcinis are rehydrated, drain and squeeze out all excess liquid and add the porcinis to the pot of mushrooms, while adding the reserved porcini liquid to the pot of simmering chicken stock.

Add the rice to the mushrooms and cook for a couple minutes.  Season the rice with salt & pepper.  Pour in the wine and stir until the liquid has evaporated.  Add a generous ladle full of stock to the rice (about 1 cup) and stir occassionally the liquid is absorbed.  It takes about 3-4 minutes.  Repeat this process several times until the rice is slighly firm but creamy- you may not need to use all of the stock.  When the rice has finished drinking up the liquid, turn off the heat and add the butter, peas, and Parmesan cheese.  Serve immediately- risotto doesn't like to hang around!

Enjoy! xo H


Friday, February 3, 2012

Easiest Manicotti


There must be something in the water.  Or maybe it has something to do with this crazy winter weather we're experiencing in Alaska.  In any event, it is now the season of BABIES.  So many of my girlfriends are either pregnant right now, or just gave birth to happy, healthy sons and daughters.  For me, this translates roughly to:  the season of the deliverable meal.  I may not have any experience when it comes to rearing newborns, but I have boatloads of experience feeding people.  As I like to say, I play to my strengths.


My friends Mera and Chester's beautiful daughter Opal is now three weeks old.  I delivered this meal to them the day after they arrived home with their new plus one.  A couple days later, I stopped by to check in on the family and Chester said to me, with complete sincerity: "Heidi, that manicotti has kept us alive for the past three days."  Mission accomplished.


A meal on the go must be: easy to assemble, filling, tasty, and transportable.  My favorite deliverable meals have got to be my creamy tomato soup and this manicotti recipe that delivers a lot of bang for the buck.  I love it because its composed of relatively inexpensive ingredients, a snap to put together, and tastes delicious.  Plus I think it's a great way to sneak some hidden veggies into a kid-friendly meal.


Making it is simple.  The filling consists of mozzerella and ricotta cheeses, chopped spinach, egg, milk, dried oregano, salt and pepper.  Pour half of a jar of good bottled marinara sauce in the bottom of a 9x13 inch pan.  Take dry manicotti tubes and fill them with the ricotta/spinach mixture.  I usually just use my clean hands- a cook's best tools.  Don't be shy to stuff the manicotti to the gills- I usually have a little filling leftover even after stuffing them with as much filling as I can. 


Line the pan with the manicotti.  Pour the other half of the marinara over the shells.  Then pour 1 cup of water or tomato juice evenly over the dish (I usually add the water or tomato juice to the empty jar of marinara and shake it up to make sure I get all the good stuff out of the jar first before pouring it over the shells).  This will add moisture to help cook the shells- it's a pretty clever trick I picked up.  Top the dish with the remaining mozzerella and Parmesan.

Cover the dish with foil and bake at 375 degrees for an hour.  Let the dish sit for 10 minutes or so before serving.  I like to serve it with a caesar salad and crusty Italian bread.  It's the perfect family supper, whether your kids are 2 years old or 22 years old!


Easiest Manicotti

2 1/2 c. shredded mozzerella cheese
1- 15 oz. carton ricotta cheese
1- 10 oz. package of frozen chopped spinach, thawed and squeezed dry with paper towels
1 egg, beaten
1/4 c. milk
1 t. dried oregano
1/4 t. salt
1/4 t. freshly ground pepper
1 package manicotti (14 shells)
1/4 c. shredded Parmesan cheese
1 jar marinara sauce (26 oz.)
1 c. tomato juice or water

Preheat the oven to 375 degrees.  Mix together 1 1/2 cups of the mozzerella, ricotta, spinach, egg, milk, oregano, salt, and pepper.  Stuff mixture into uncooked manicotti shells, making sure to fill them completely.  Spray the bottom of a 9x13 inch pan with nonstick spray.  Pour 1/2 of the marinara sauce in the bottom of the pan.  Line the pan with the filled manicotti shells.  Pour the rest of the marinara over the top of the shells.  Pour the tomato juice or water into the half-filled jar of marinara, shake it up, and pour it evenly over the shells.  Top the dish with the remaining 1 cup of mozzerella, and the Parmesan cheese.  Cover the dish with foil and bake for 1 hour.  (You can remove the foil in the last 5 or 10 minutes of baking if you want the top to be a little more golden brown).  Let the dish set for 10 minutes before eating.

Enjoy! xo H


Sunday, December 18, 2011

Red Snapper Puttanesca (and the Vacation From Hell)


It feels like 100 years since my last post! My apologies, although I do have an awfully good excuse and a story to boot. I recently came back from a trip to visit my sister's family in Oregon, and a visit to my parent's condo in Palm Springs. The first part of the trip went as planned, and as usual my time with Holly, Sam and my adorable niece Claire was far too short. (Except for the 8 back-to-back readings of 10 Little Ladybugs, which I could have done without.) 

Girls in the kitchen- me, Holly, and Claire
As for the second part of the trip...well, it read a little like a movie script for National Lampoon's Palm Springs Vacation (starring Katherine Heigl, the prettier, more famous version of me). The script goes like this: young woman seeks rest and relaxation after a grueling month working multiple weekends at the office. She arrives at her parents recently remodeled and presumably vacant condo, only to discover that someone has clearly been living there. As the drama unfolds, young woman discovers evidence of shady business at the condo. Young woman gathers up her stuff and heads to a hotel. Enter locksmiths, police, confiscation of illegal paraphernalia, cleaning crews, and alarm installation. Just as soon as it appears the worst is over, and the young woman might actually be able to salvage the last few days of her vacation and make it to the fantastic outlet mall 20 miles away, young woman's 86-year-old back goes out. And grounds her. In her hotel room. For the rest of the trip.


But WAIT...the antics don't stop there!  Upon the young woman's return home (hallelujah!), she discovers that the entire contents of her chest freezer are roughly the temperature of luke-warm water. For the young woman, who loves salmon fishing, and uses Costco as her neighborhood grocery store, and gets a thrill out of buying in bulk and freezing things for later use, well...you get the idea.


Sounds like a movie, right? Nope, that was my LIFE. Two weeks I'd rather forget. Although I did scrape together a happy ending with the generosity and kindness of all of my wonderful friends who have lent me a hand while I laid on the couch and watched them work.  Unfortunately, I had planned to work on so many posts from the comfort of a lounge chair next to the pool. Seeing as how I could only tolerate a sitting position for about 4 minutes at a time, that never happened.


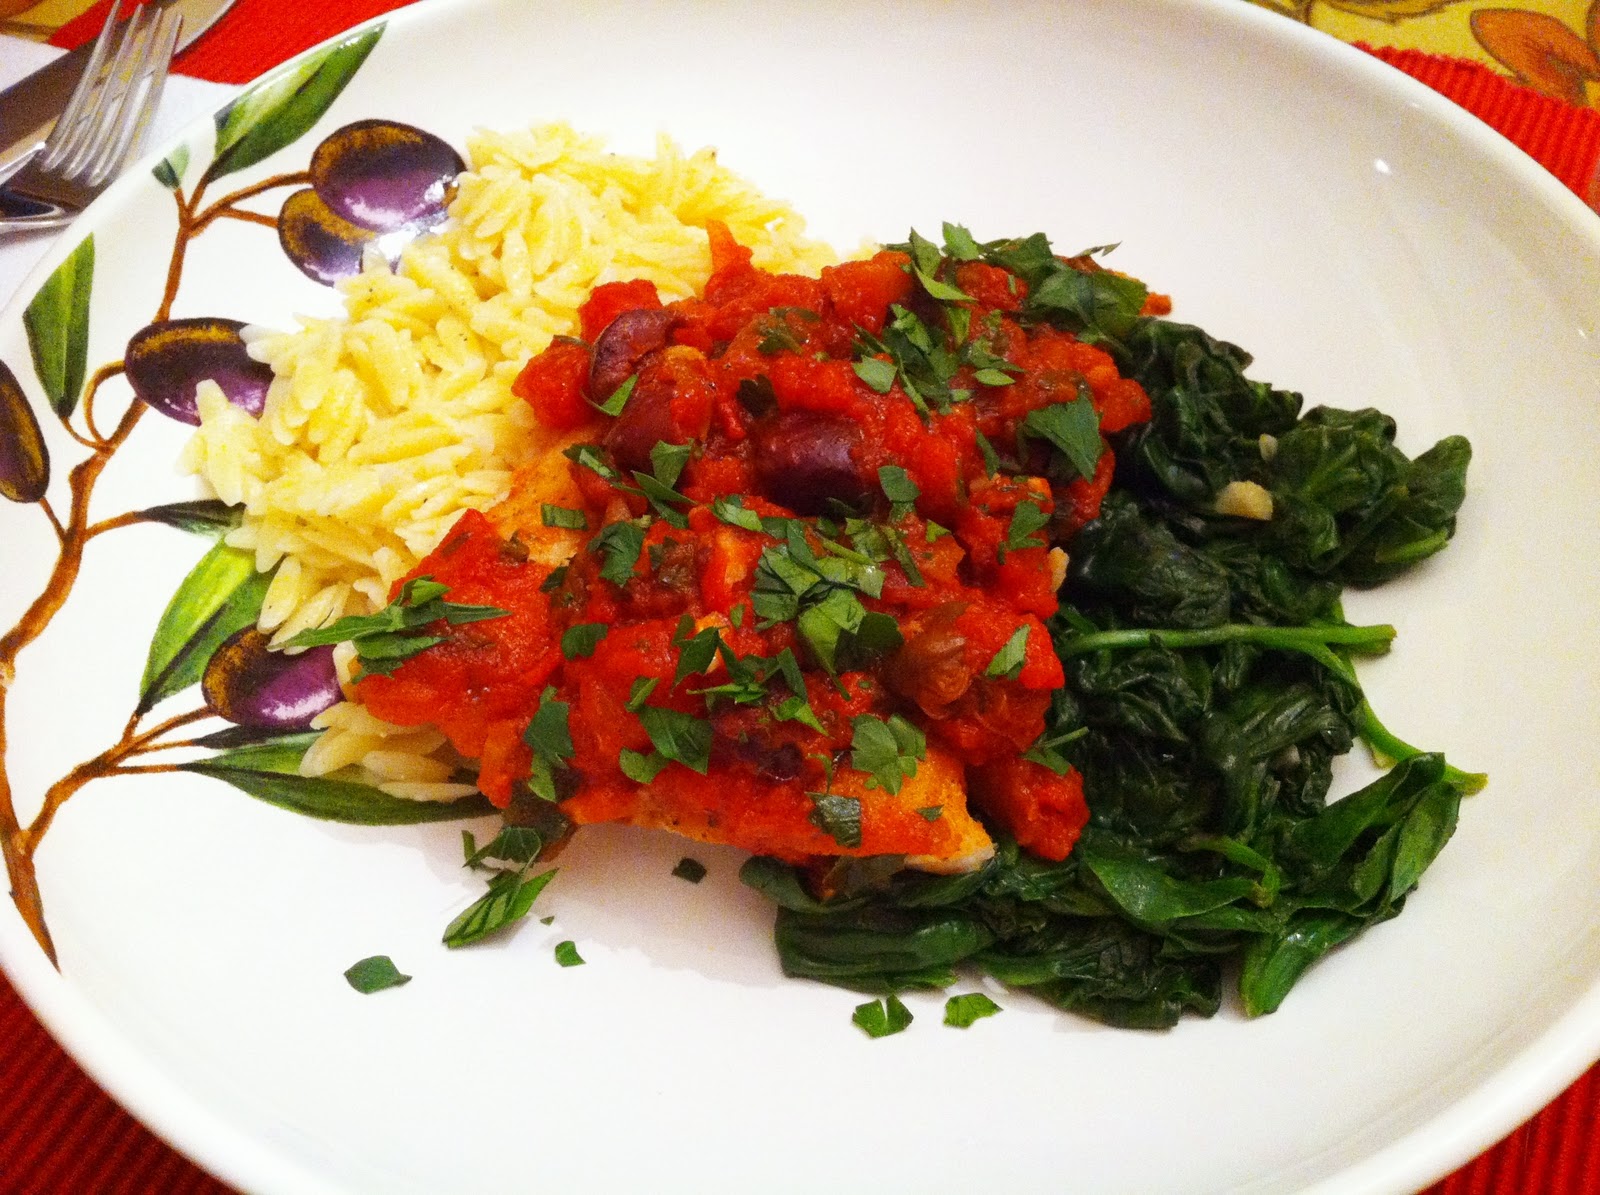
As my back is nearly recovered from the trauma of vacation, I finally have an opportunity to post a delicious recipe that Holly and I made before the Vacation From Hell really began.  It's a recipe for Red Snapper Puttanesca inspired from a recipe for Cod Puttanesca in the wonderful cookbook Mother's Best, which is a collection of recipes from the woman behind Mother's Bistro in Portland (not to be missed!). It's also one of the best birthday presents my sister has ever given me.  This is a great healthy meal to make around the holidays when friends, family, and coworkers are shoving Mexican wedding cakes, homemade fudge, and peanut brittle in your face.

Puttanesca sauces are bold and delicious- full of tomatoes, capers, and olives. The word "puttanesca" roughly translates in Italian to "ladies of the night." Apparently, those ladies don't have a lot of time on their hands to shop at the grocery store, so they throw together sauces from pantry staples. Whether that's true or not is irrelevant. I just like the word "puttanesca." It's got a ring to it.  Say it over and over and you'll see what I mean.


Holly and I traveled to her local fish market and found some beautiful pieces of red snapper, but you could also use cod or halibut- any mild fish will do.  Just make sure you work with a thin fillet. If it's thick (as often halibut is) then you might have to finish the fish in the oven after browning on both sides to ensure that it's done, or slice the fillet in two.  Salt and pepper both sides of the fish, then dredge in the flour and shake off all the excess.  Saute in olive oil until golden brown, or about 3 minutes each side (don't overcook them!  Nothing tastes worse than overcooked fish).  I did this in batches so that I didn't overcrowd the pan, so I periodically added more olive oil as needed.


When the fish is done, put them on a baking dish and keep them in the warm oven until you're ready to serve.  In the meantime, using the same saute pan (you might need to add a little more olive oil) cook the garlic for about 30 second or so until it's just brown (overcooking garlic makes it taste bitter).  Add the tomatoes and a few grinds of pepper and cook for about 2 more minutes. 


Add the olives, capers, wine, and chopped parsley.  Turn up the heat to medium-high and cook for a few more minutes until the sauce is slightly reduced.  At this point, taste for seasoning.  My capers were so salty that I didn't need to add any salt to the sauce!


Remove the pan from the heat and, if you want, add the butter (this really adds richness to the sauce, but is not necessary if you'd rather leave it out).  Remove the fish from the oven and you're ready to eat!  I like to serve this family-style, so I piled the fish on a serving platter and spooned sauce over the top.


Top it with chopped fresh parsley and you've got yourself a beautiful dinner.  If you have extra sauce, put it in a bowl on the table for folks to spoon on themselves (it was so good I just started eating it with a spoon).  I loved this dish, and I think next time I'll try adding some anchovies and red pepper to the sauce for added flavor and kick. 

Serve this dish with rice or orzo pasta and sauteed spinach.  Delicious and healthy holiday fare!


Red Snapper Puttanesca
(adapted from Mother's Best: Comfort Food That Takes You Home Again)

4 (6-ounce) red snapper or cod fillets (about 1½ pounds)
1¼ cup flour
3 T.(or more) olive oil
1½ cups good-quality diced or chopped canned tomatoes (or two medium diced fresh tomatoes if they're in season)
5 cloves garlic, finely chopped
1/3 cup pitted kalamata or niçoise olives
2 T. capers, drained and rinsed
¼ cup white wine (I used pinot grigio)
2 T. butter (optional)

kosher salt and freshly ground pepper
Orzo and sautéed spinach, for serving

Preheat the oven to 200 degrees.  Sprinkle salt and pepper on both sides of the fillets.  Place saute pan over medium heat and add olive oil.  Dredge fillets in flour, making sure to shake off the excess.  Place in saute pan and cook to a golden brown, about 3 minutes each side being careful not to overcook them.  (If your fillets are on the larger side, do this in batches so you don't overcrowd the pan.  Just add a little more olive oil each time you cook a new batch.)

When the fish is done, place on an oven-safe baking dish and keep warm in the oven.

Add garlic to the pan (you may have to add a little more olive oil) and saute for about 30 seconds, or until it's just brown.  Add tomatoes and a few grinds of pepper and cook for about two minutes more.  Add capers, olives, white wine, and parsley (reserving a little for garnish).  Turn the heat up to medium-high and cook for several more minutes, or until the sauce has reduced a bit.  Once it's done, remove from the heat and stir in the butter.

Check for seasoning- capers and olives are often very salty, so you may not need any salt.  Remove fish from the oven, top with the sauce and a little more parsley.  Put leftover sauce in a bowl for the table.  Serve with rice or orzo pasta and a side of sauteed spinach. 

Enjoy!  xo H

Sunday, November 6, 2011

Italian Wedding Soup


Fall has now turned to winter, and the snow flakes have transformed the landscape once again.  Milo the wonder pup is thrilled- snow chasing is his favorite sport of all time.  (What, it's not a sport?  Don't tell him, he thinks he's in training.)

 
I love the fresh food of spring and summer, but there's something so deeply satisfying about the smells that come out of a winter kitchen.  Warm, hearty dishes designed to warm the soul when it's, oh, about 8 degrees outside.  Which it will be...very soon.

I've mentioned this before, but if my job in life was to follow a recipe down to the last teaspoon I'd be living out on the streets.  It is not uncommon for friends to come over and see three seperate cookbooks opened up to a clam chowder recipe (yeah, that happened).  Usually, when I want to see how a singular recipe actually turns out without modifying it, I make a phone call to my sister Holly.  She'll actually follow a recipe the first time.  Plus, we both have the cooking gene, we have similar styles of cooking (transl: each of us owns all of Ina Garten's cookbooks), and we look an awful lot alike.  No, that last characteristic doesn't really help us in the kitchen, but it is fun to tell people about how my brother-in-law Sam thought we were the same person roaming the halls at Willamette Law School for almost an entire school year.  (Yeah, that happened too.)

A few years ago I made my first batch of homemade chicken stock.  I was completely pleased with myself.  After refrigerating it, skimming the fat, and pouring the stock into individual containers for freezing, I thought...now what?  I called Holly, who told me to try this soup from our girl Ina.  Holy moly, after that I wanted to dedicate my homemade stock solely to this dish.  This is a delicious Italian-American soup which I doubt is served at Italian weddings- I've heard that the "wedding" part of this dish actually refers to the wonderful marriage between meat and vegetables.  In that case, "I do."

 True to form, this is my own version of Ina's terrific recipe.  I think my changes simplify the soup without sacrificing any flavor.  First, you start with the meatballs.  Usually Italian Wedding Soup calls for beef meatballs, but Ina uses chicken and I love the flavor.  Like homemade chicken noodle soup with the volume turned up. 

The original recipe uses a mix of ground chicken and ground chicken sausage.  I think that requires opening too many different packages, so I just use chicken sausage and they're delish.  (In fact, these meatballs are so good on their own you could use this as appetizers for your next holiday party served with a side of marinara.) In a pinch, I've used turkey sausage.  But lately chicken sausage has been easier to come by so I find I don't need to substitute as often.  For the meatballs, the food processor is a cook's best friend.  I whir up the Parmesan and the bread crumbs (any white bread will do, and even wheat if it's all you have, but I used the artisan white loaf from my friend Janis at Fire Island Rustic Bakeshop- my favorite bread ever!) in the food processor, easy peasy.


Great tip: "grate" Parmesan in the food processor.  Just throw chunks of cheese in and let 'er rip.

If you use store-bought breadcrumbs, you may need to add a little more milk to the meatball mixture because it might be a little dry.  After all the meatball ingredients are mixed, drop them by the rounded spoonful onto a parchment-lined baking sheet- it makes roughly 35 meatballs. 

Baked meatballs.  These are tasty, tasty balls. 
While the meatballs are baking, start the soup by sauteing the onion, celery, and carrots in a little olive oil.  Once they're soft, add the stock and wine and bring it to a boil.  Turn the soup down to a simmer and add the pasta.  I like using little ABC's or stars.


Cook the pasta in the simmering water for about 8 minutes, or until the pasta is tender.  Then add the chopped dill, kale or spinach, and the meatballs. 


Cook for another minute, and taste for salt & pepper.  Ladle the delicious soup into bowls and top with a little more grated Parm.  Yummy, yummy, yummy, yummy.


Italian Wedding Soup
(Adapted from Barefoot Contessa)

For the meatballs:
1 lb. chicken sausauge (make sure it's not the already-cooked variety)
2 T. milk
2/3 c. fresh breadcrumbs
1/3 c. grated Parmesan
1 egg, beaten
2 cloves garlic, minced
2 T. chopped parsley
kosher salt and fresh pepper

For the soup:
2 tablespoons olive oil
1 medium onion, diced
3 carrots, diced
2 celery ribs, diced
10 c. chicken stock (preferably homemade- see recipe below)
1/2 c. dry white wine (I usually use a savignon blanc or pinot grigio, or whatever is leftover in the fridge)
1 c. small pasta (I usually use stars)
1/2 minced fresh dill
6 oz. kale, ribs removed and chopped, or 12 oz. baby spinach 

1.  Preheat the oven to 350 degrees.

2.  For the meatballs: combine all ingredients gently with your hands or a fork.  Drop by rounded spoonfuls on a baking sheet lined with parchment paper.  You should have about 35 meatballs, give or take a few.  Bake for 30 minutes, or until golden brown.

3.  For the soup: on medium-low heat, add the olive oil to a large soup pot.  Cook the onions, celery, and carrots for 8-10 minutes or until soft.  Add the stock and wine and bring it to a boil.  Turn down to a simmer and add the pasta.  Cook about 8 minutes or until the pasta is tender.  Add the dill, meatballs, and kale or spinach and cook for about one more minute. 

4.  Ladle the soup into bowls and top with a little extra grated Parmesan.  (And the soup tastes even better the next day!)

The Best Homemade Chicken Stock
(Makes about 20 cups of stock)

Don't bother peeling the veggies- just make sure they're well scrubbed!  After making stock a few times, I've found that roasting the veggies makes the most delicious stock.

2- 5 pound chickens
6 carrots, sliced in half lengthwise
4 celery ribs with their tops if they have them, sliced in thirds lengthwise
2 onions, sliced in half
20 sprigs of parsley
20 sprigs of dill
20 sprigs of thyme
2 t. peppercorns
2 bay leaves
2 T. salt


1.  Preheat the oven to 425 degrees.  Remove the giblets from the chicken, but save the neck.  Rinse and pat dry.  Cut the wings off the chickens.

2.  Put the chicken wings, carrots, celery, and onion in a large roasting pan.  Toss with 1-2 tablespoons of olive oil, a good pinch of salt and peppper.  Toss together, then roast in the oven for 35-40 minutes.

3.  In the meantime, place the chickens in a large stock pot (the biggest one you have).  Fill the pot with 5 1/2 quarts of cold water.  When the veggies are done, add the veggies and the rest of the ingredients to the pot.  (If you have a stock bag, which is similar to cheesecloth, place the veggies, chicken wings, the herbs, and peppercorns in the bag, tie it off, and place it in the pot with the chickens.)

4.  Bring the pot to a boil (this will take a little while).  Once boiling, lower the heat and simmer the pot uncovered for 4 hours.  Remove the scum when it forms.  After about an hour of simmering, remove the chicken and let it cool for a bit.  Remove all of the chicken meat and put the bones back in the pot to simmer (if you don't remove the chicken meat now, it will be the consistency of shoe leather after 4 hours).  Save the meat for another use (I put it in plastic baggies, wait for it to cool in the fridge, and freeze it for later).

5.  Strain the contents into plastic containers and refrigerate overnight.  The next day, skim the fat from the top of the stock, and use the stock within a few days, or freeze.  This is the secret to the best soups you've ever tasted!

Enjoy! xo H