Showing posts with label dessert. Show all posts
Friday, October 9, 2015
gooey butter cake
There is a time for kale, and a time for quinoa. A time for lentils with herbed goat cheese, and a time for avocado on toasted sprouted wheat bread. A time to fill your body with fruits and vegetables, and fuel it with the nutritional goodness that only whole foods can provide.
Folks, this is not that time.
The timing of this post is apropos, since I am in the process of wrapping up several months of heavy travel, and heavy eating. As I time this, I'm on a plane eating kale chips (and making a total mess of it, come to that- I'm pretty sure my seat mate thinks he's sat next to an overgrown 2 year old whose food ends up everywhere but IN HER MOUTH). Breakfast was a protein bar, lunch was a veggie chili. All this healthy-shmealthy food, but my mind is still reminiscing about the fresh pasta, gnocchi, rustic bread with homemade butter, and panna cotta from the night before. Ah, memories. **SNIFF**
I'm finally get a decent stretch of time at home, and I plan to embark on some healthy, clean eating to undo the sins from the last couple months. But NOT before I post a recipe that flies in the face of clean eating: ooey gooey butter cake!
This recipe comes from a former beau who hailed from the south. The recipe is the purest example of the single girl's golden rule: never break up with a guy before you get his recipes. Roger that.
The cakes origins lie in St. Louis, Missouri. There are fancier recipes for it that you could try, but the one below is so easy and so incredibly delicious, why go to the trouble? You're busy enough! This recipe is cut from the same cloth as my favorite Cheesy Corn Casserole. Staple pantry ingredients + box mix = a creation that will make the entire after church crowd swoon.
The cake is made in two layers. And the result is a buttery, decadent treat that I can almost guarantee you will make over and over again. I've never had a dessert quite like it, and I can't wait for you to discover it, too!
Gooey Butter Cake
For the first layer:
2 eggs
1 box yellow cake mix
1 teaspoon vanilla extract
1 stick of melted butter
For the second layer:
3 3/4 cups (or 1 small box) powdered sugar (plus a little extra for sprinkling)
2 eggs
1 teaspoon vanilla extract
1 8 oz. package of cream cheese at room temperature
(1) Preheat the oven to 350 degrees.
(2) Mix 2 eggs, cake mix, vanilla, and the stick of melted butter. The mixture will be thick. Spread in an ungreased 9x13 inch pan.
(3) Next, mix the powdered sugar, 2 eggs, vanilla, and cream cheese. Spread on top of the first mixture.
(4) Bake for 35-40 minutes, or until golden brown on top. Don't overbake!
(5) When cool to the touch, sprinkle with powdered sugar.
Enjoy!
xo h
Sunday, September 13, 2015
chicken with morels, rhubarb galette, pickled hatch chilies, and a long overdue post!
Fall has arrived in Alaska. I love this time of year. The mornings are crisp and cold, the leaves are beginning to turn, and my flowers are just about ready to call it a season.
| Lobster roll nirvana |
Like so many other folks, my summer got away from me and my life refuses to slow down. As I was picking the last of the plump raspberries off the plentiful bushes that line my backyard, I suddenly realized that as my life seems to have evolved this year, so must my little blog. Finding time to cook is not a problem. Cooking is my therapy after a long day on the job. For me, it’s like breathing and sleeping. And without it, I’m just not me.
But finding the time to write recipes, take photos (which for this amateur blogger is not an insignificant amount of time), and publish new posts has proven a bit more difficult. So I’m just going to improvise!
Oh, I’ll still post recipes and pictures- don’t you worry. Some of the recipes will be my own, but many may just highlight recipes that I’ve tried and loved and want to share with others. My pictures may not be as carefully staged and styled to perfection, but they'll still be my own.
This summer in Alaska has truly been a delicious one, and I wanted to share some of its culinary highlights. It began on a foraging expedition with friends Renee and Michael for wild morels. I posted last year about my foray into mushroom foraging. After last year’s beginners run, I was totally excited to tackle fungi foraging this summer. And I’ve done so with gusto!
![]() |
| Creamy chicken with morels, photo by Renee |
My friend Renee is a fabulous home cook, who's culinary skill and technique exceed my own. The woman is stealth in the kitchen. We turned this incredible bounty of morels into a truly astounding dish: Creamy Chicken with Morels, (recipe courtesy of our guru Ina Garten). My mouth still waters thinking about that meal. I cannot wait to hunt for morels again next spring!
While I was home with my family in Fairbanks for Fourth of July, my sister Holly and I threw together this Rhubarb Galette, courtesy of our pal Martha. It has a cornmeal crust that is TO DIE FOR and comes together very quickly. My only modification is that I swapped out half the ice cold water for ice cold vodka, because I’ve learned that it makes a flakier crust. Just trust me on that (or don’t, and Google it for yourself!)
| Rhubarb galette with a cornmeal crust. |
Juneau was chock full of salmonberries this year (Juneau friends— is it like this every year?!) I’ve said before, but it bears repeating, that I have a nearly insatiable enthusiasm for foraging wild edibles. It's difficult to locate my "off" switch when you turn me loose on a berry patch. I located these jewels in a friends backyard. While I was excited at the idea of converting them into jam, the delicious treats didn’t make it through the night as we gobbled them up like candy. Not quite too pretty to eat!
| SALMONBERRIES! |
One of the very best parts of my summer was spending time in Bethel with my friend Valerie and her beautiful family. Valerie and her Yu’pik ancestors have been harvesting the land in Western Alaska for thousands of years. Val taught me the traditional way of processing and smoking wild salmon, just as her mother Tilly taught her, and Tilly’s mother before her. Just look at the beautiful salmon in her smokehouse!
With the swift work of her ulu, Valerie quickly processed the salmon we caught by setnet. My job was to tie up the strips of salmon to hang in the smokehouse. I’m proud to say that I excelled at this task. I tied up salmon LIKE IT WAS MY JOB. And it was…for two whole hours. I ate so much smoked salmon that weekend that I nearly made myself sick. Zero regrets.
A trip to Sitka last month resulted in a BOATLOAD of winter and golden chanterelles. I was excited to learn how to identify them easily so that I know what to look for on future expeditions. My friend Heather’s adorable mother Benny was totally thrilled to share her love for mushroom foraging with others, and was the ultimate host. She turned our bounty into both mushroom quiche and cream of chanterelle soup. HOLY DELICIOUSNESS, BATMAN. Sadly, I don't have pictures of the food because I was too busy stuffing my face (along with her homemade biscuits- we ate like champs).
| Milo's version of "blueberry picking" |
Of course, no summer in Alaska is complete for any forager without taking a hike up a mountain for wild blueberries!
Just like last summer, my friend Erica joined Milo and I for a bit of hiking and a lot of picking. Last year I posted this tasty recipe for blueberry cornmeal cake, which I love. I think this year I might make blueberry jam with my bounty. If so, I’ll post it!
Last year I posted a picture of some pickled Hatch chilies that I made and enjoyed all winter. Another shipment just landed in the grocery stores here in Alaska and several of your have texted me for the recipe. I just put up another batch last week, and here's the recipe I used. I eat them with my Taco King takeout so I feel like I'm getting a few veggies as I scarf down my carne asada special tacos.
| Pickled Hatch Chilies |
This is just a scattering of my summer food adventures. I plan to make jams for winter soon, and pickle a few more veggies to eat all year round. I'm even going to take another stab at perfecting rhubarb ketchup- and if I succeed, I'll post it!
Alrighty, Alaska...bring on winter!
xo h
Monday, April 13, 2015
dispatch from juneau: chocolatey no-bake cookies
Over the past few weeks, my days here in Juneau are spent in committee meetings, dealing with budget numbers, and figuring out just where to find the public lounge in the Capital Building (IT’S ON THE SECOND FLOOR, FOR THE LOVE OF ALL HOLY. Why is this so difficult to remember when I’m in the building?!) As a result, my appetite can be summed up in two words: comfort food.
Hellllooooo???? What happened to "New Year’s Resolution" Heidi???? The one that was going to try eating vegetarian most days of the week, cut back on cheese, and hold the dessert? The one that was going to try to fit back into her cute designer jeans that cost far more than they are actually worth?
I can’t find her. She’s nowhere to be found (and frankly, neither are the jeans!) She’s been replaced by "If It Makes Me Feel Good I’m Going To Eat It" Heidi. I’ve met this Heidi before. She made an appearance while studying for the bar, and again when she was buying a house. I spotted her briefly the week leading up to an important oral argument in court. But she’s overstaying her welcome right now.
In any event, the good news is that "Comfort Food" Heidi is cooking a lot these days. She’s too hungry to take photos and post them, but she’s an awful lot happier when she’s in the kitchen!
Ok, enough of the third person voice.
I’ve spent a lot of the time in my tiny little Juneau kitchen lately, and it feels glorious! Navy bean and ham soup, gnocchi with pesto, homemade ramen, and a delicious scratch bolognese recipe passed down to me from a friend whose family used to own an Italian restaurant in New York City frequented by Frank Sinatra. (That one I hope to make again and post soon!)
Along with savory comforts, I’ve also been craving these chocolatey no-bake cookies. My perfect little comfort food in dessert form. These treats are easily one of my favorite bites. I think I’ve made them 3 or 4 times since I’ve been down in Juneau, and I figured it was time I shared them with others. Many of you have certainly made these many times over the years, and they’re a classic for a reason. For starters, they don’t involve the oven. And for those of us who are slightly baking impaired (guilty), that’s a beautiful thing.
My Dad was visiting in Juneau recently and, to my surprise, informed me that he’d never had a no-bake cookie. He was extremely skeptical about them! I could tell he figured this was simply one of Heidi’s goofy ideas. Cookies should be baked, he thought.
After they had cooled sufficiently and were ready to eat, I handed him one to try. He took one bite and his eyes lit up! After he finished the cookie, Dad proclaimed, “For my very last meal, I want these cookies for dessert!”
In that spirit, I’ll likely make these cookies after the completion of the legislative budget process. :)
Classic Chocolatey No-Bake Cookies
(Adapted from Add A Pinch)
1 3/4 cups sugar
1/2 cup milk
3 tablespoons unsweetened cocoa powder
8 tablespoons unsalted butter, cut into big pieces
2 teaspoons vanilla extract
1/2 cup creamy peanut butter
1/2 teaspoon salt
8 tablespoons unsalted butter, cut into big pieces
2 teaspoons vanilla extract
1/2 cup creamy peanut butter
1/2 teaspoon salt
3 cups quick cooking oats
In a medium sauce pan, heat sugar, milk, butter, and cocoa powder over medium-high heat. Bring to a boil and cook for 3 minutes. Remove from the heat and add vanilla, peanut butter and salt, and mix well. Add oats and mix until fully incorporated. Drop by rounded tablespoons onto a sheet pan covered in parchment or aluminum foil. Allow cookies to cool for 30 minutes. Makes 2-3 dozen delicious little chocolatey bites!
Enjoy!
xo H
Wednesday, October 29, 2014
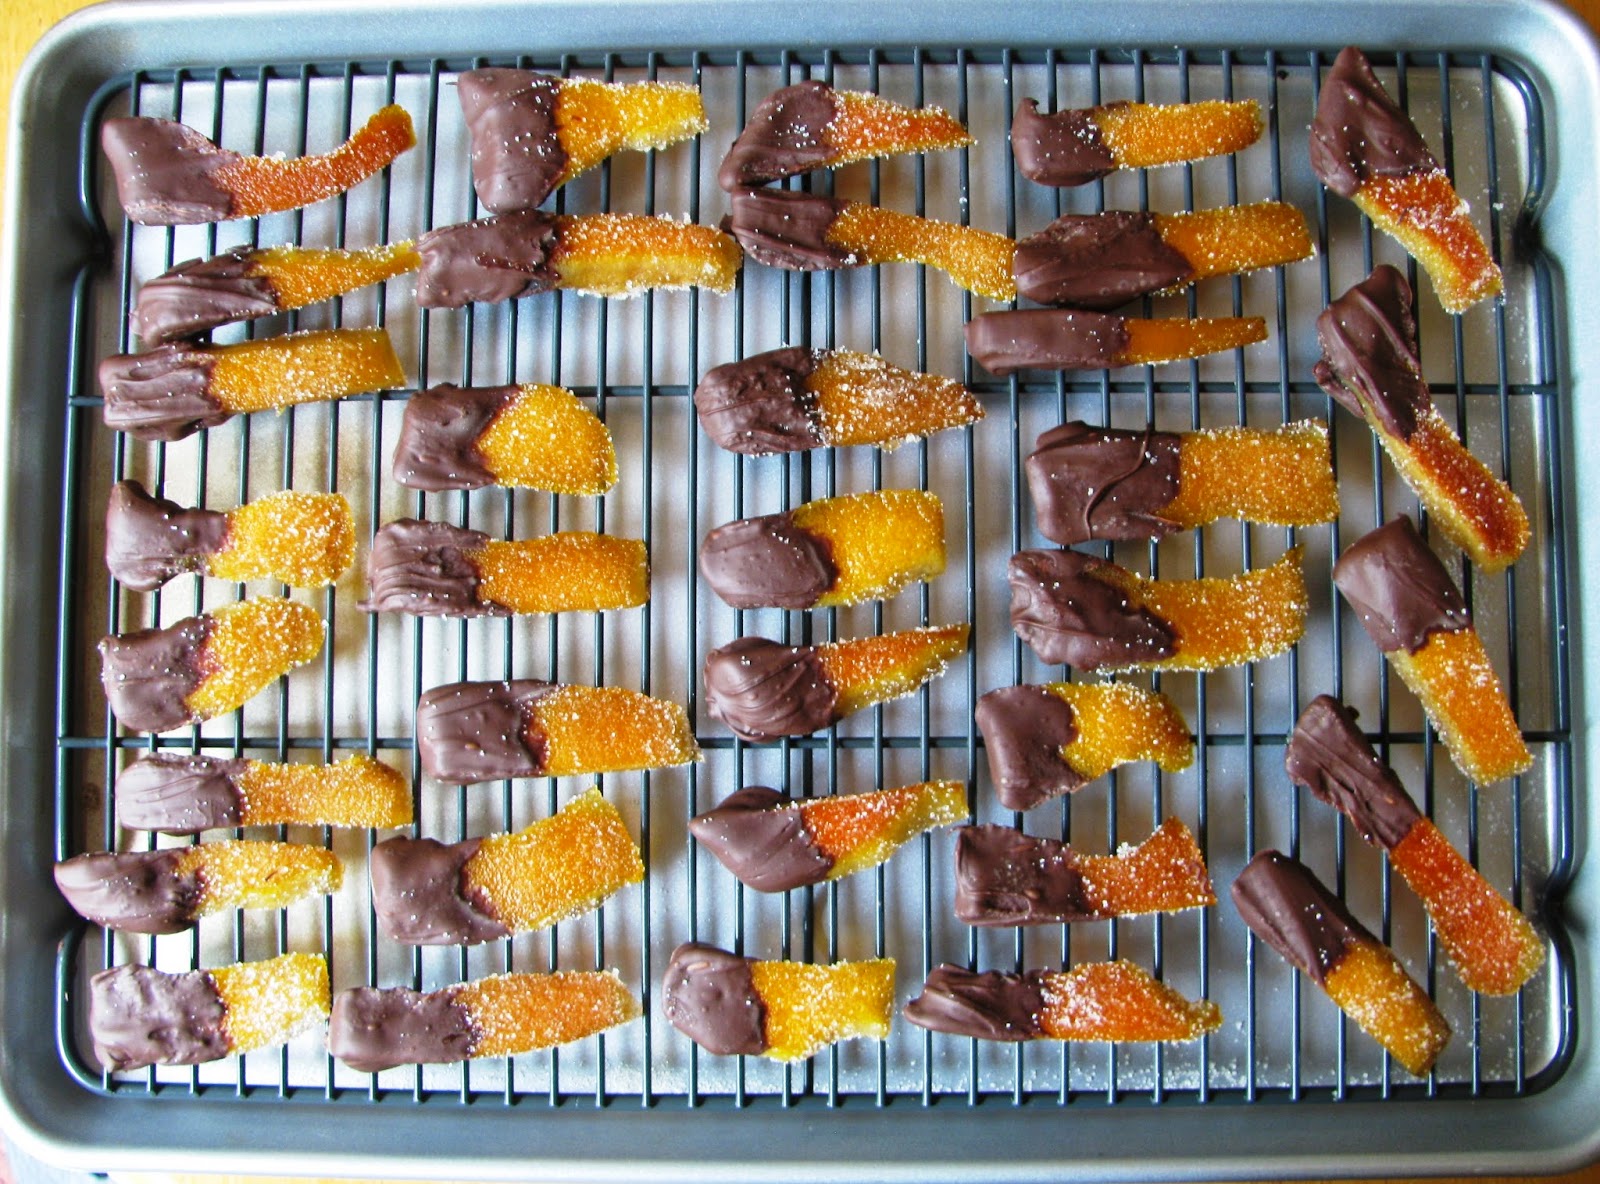
chocolate-dipped orangettes
Happy Halloween, little goblins! This post represents a departure for Chena Girl. I've been called many things over the course of my life. Heidi, for starters. But also...lawyer, cook, forager, social butterfly, Suzy Homemaker (by my sister Holly), loud (by my brother Erik), fisherwoman, hostess, but...candymaker? Nuh-uh. Never.
Hey! This post is making history!
| May I present to you...the world's ugliest kitchen counter! I'm thinking of creating a Kickstarter campaign for a new kitchen. Thoughts? |
I think it's healthy to push your personal boundaries in the kitchen. In fact, I think pushing your boundaries is healthy in most aspects of life. Even if you end up pushing it just a LITTLE too far. Like the time I was trying hard not to dress too "matchy matchy" last year and showed up to work wearing nearly every color of the rainbow. Blue tights, a red printed dress, and a bright yellow scarf. I was a walking fashion catastrophe/perfectly dressed for directing construction traffic. I looked so ridiculous that my secretary called me "the elf" the rest of the day. True story.
[In fact, I used to have the photographic evidence to prove it. But as I flipped back through the pictures on my phone, I realize that my Back to the Future Self must have deleted it in a clear attempt to save Future Self from the public shaming that she surely would have submitted herself to.]
But I digress.
I was home one Saturday folding laundry while watching TV when I noticed a woman making these seemingly easy candied orange peels dipped in chocolate. I had 3 naval oranges on my counter, and all of the ingredients in my pantry. So I finished the laundry, and then got to work adding a new title to my resume: Candymaker.
And they turned out GREAT!
In fact, they turned out a little too good. My plan was to make a huge batch of them, save a handful (5-10 tops) for myself, and give the rest away as gifts to family and friends.
HAHAHAHAHAHA!!!
I'm sure my friends and family would have loved them. Maybe next time.
Chocolate-Dipped Orangettes
4 oranges
2 1/2 cups sugar
1 cup corn syrup
3 cups water
1/2 pound semi-sweet chocolate
granulated sugar, for sprinkling
(1) Slice the rind off the oranges and slice into desired thickness. Place orange slices in a wide skillet or pan and cover with cold water. Bring to a boil, then drain. Repeat this process a total of three times.
(2) Heat the sugar, syrup, and water in a medium-sized pot. Once the sugar is dissolved and the syrup is warm, submerge the blanched orange peel in the syrup and cover with a lid that is one size smaller than the pot (this way, every peel is completely submerged). Simmer for 60-90 minutes. Place a wire cooling rack over a piece of parchment paper or aluminum foil. Remove the peels from the syrup (which you can save for Italian sodas!) and place them on the wire rack- the parchment/foil will catch drips and make for easy cleanup.
(3) Melt 2/3 of the chocolate chips in the microwave, stopping to stir the chips every 30 seconds. (Be careful NOT to microwave them too long!) Once the chocolate chips are melted, stir in the remaining 1/3 of the chips (called "seeding" the chocolate, which results in a smoother melted chocolate), and stir until melted and smooth.
(4) Dip orange peel into chocolate and cool on parchment paper. Sprinkle orange peel "tails" with granulated sugar, if desired.
Enjoy!
xo h
Thursday, August 28, 2014
wild alaska! blueberry cornmeal skillet cake
I have a massive issue when it comes to foraging. Some would call it my gift. Others (like my berry-picking friends) would call it my curse. You see, deep in the incomprehensible double-helix thingy of my DNA structure, I have an unmistakable gene for hunting and gathering. I LOVE it. But not in the way you love your favorite sweater or lasagna on Fridays. I mean, I love foraging in a way that were I left to my own devices I would gather to my heart's content and never come home. You would find me 4 days later up on a mountain picking berries happy as a clam but desperately needing a shower.
As I've said before, I don't have an "off" switch when it comes to foraging. Which is one of the main reasons I always bring a friend with me whenever I embark on my little gathering excursions. Because someone has to be there to make me stop.
I'm not sure exactly what it is that drives me to harvest Alaska's wild bounty. I suspect it's a mixed bag of reasons, one being simply: FREE FOOD. But it's roots are much deeper than that. There is something so satisfying about hitting the jackpot and discovering a trove of currants, or that Devil's Club buds are at the perfect time for harvesting. And I wouldn't engage in a single foraging expedition if the results weren't also delicious. I am continually amazed at the plentiful variety of edible plants growing in our own (enormous, massive, breathtaking) Alaskan backyard.
I also believe that I'm most at peace in nature. And we have a lot of that in Alaska. I mean, just look at the scenery from the berry-picking expedition with my friend Erica from last week!
This blueberry skillet cake is nearly fool-proof, which is perfect for those of us that are slightly baking-impaired. It comes together in very little time and I love bringing the whole skillet to the table for serving. Delicious with homemade whipped cream or vanilla ice cream, it's also perfect on its own and makes a great breakfast treat. Lately, my taste buds have been craving desserts that aren't super sweet, and this cake fits the bill. It's not nearly as sweet as your standard cake, which is due in part to our tart Alaskan blueberries. I've made it with raspberries from my backyard and it's slightly sweeter, but equally delicious.
And so, I encourage everyone to get outside, pick some berries. And see if the foraging bug bites you, too!
Alaska Blueberry Cornmeal Skillet Cake
Serves 8-ish (Adapted from Martha Stewart)
1 1/4 cups all-purpose flour
1/2 cup yellow cornmeal
2 teaspoons baking powder
1 teaspoon salt
1 cup plus 2 tablespoons sugar, plus an extra 1/4 cup for sprinkling
1/2 cup low-fat buttermilk
2 large eggs
7 tablespoons unsalted butter, melted, plus 1 extra tablespoon for skillet
2 cups Alaska blueberries (fresh or frozen)**
(1) Preheat the oven to 375 degrees. Whist together flour, cornmeal, baking powder, salt, and 1 cup plus 2 tablespoon sugar in a large bowl. In a separate bowl, whisk together buttermilk, eggs, and melted butter. Pour the wet ingredients into the dry and whisk just to combine.
(2) In a 10 inch oven-proof skillet (I used my trusty Lodge Cast-Iron), place one tablespoon of butter in the skillet and pop it in the oven until it's melted and the skillet is hot (3-5 minutes). Take the skillet out of the oven and swirl the butter to coat the bottom. Pour the batter into the skillet, and scatter the blueberries on top. Sprinkle with the remaining 1/4 cup sugar.
(3) Bake in the middle of the oven until it is golden brown, about 40-45 minutes. Let cool before slicing it. This is great served either warm or at room temperature.
**Substituting Alaska raspberries for the blueberries is equally delicious.
Enjoy!
xo h
Friday, July 26, 2013
peanut butter banana bread
One thing I've always been proud of is that I'm the least picky eater I know. This is totally true. Even as a little kid, I was constantly willing to taste things that others wouldn't. Sushi in elementary school, Brussels sprouts back when they weren't cool, and buckets of steamed clams that my Mom, my sister and I would chow down on no time. In fact, we're a whole family of adventurous eaters! It's one of my favorite things about my clan.
So how on Earth did I develop a distaste for bananas? To this day, it remains a mystery.
Actually, the real mystery is how I developed a distaste for bananas in their natural state, while still LOVING banana bread. Riddle me that, will you?
This is a recipe for one of the baking world's greatest inventions: the quick bread. For those of us that tend to stray from the reservation when it comes to cooking-- i.e., a little of this, a pinch of that...hey, what's that measuring spoon for??-- this recipe is very easy and forgiving. The banana plays second fiddle to the peanut butter, adding a hint of banana flavor and lots of moisture. Perfect for the banana-impaired. And how can you go wrong by adding a few chocolate chips to the mix?
I made this bread before heading off to a weekend cabin adventure near Talkeetna, Alaska and it was enjoyed for breakfast, a sweet treat at lunch, and dessert after dinner. Note to self for future Alaska wilderness adventures: quick breads are the perfect snack to bring along!
Just make sure your bananas are nice and ripe. I mean RIPE ripe. Mine were almost black- completely soft and sweet and at their peak banana bread life stage. This makes for the BEST bread.
Peanut Butter Banana Bread
(thanks to my friend Cheryl for the recipe!)
2 1/2 cups all-purpose flour
1/2 cup granulated sugar
1/2 cup brown sugar, packed
1 tablespoon baking powder
3/4 teaspoon salt
1/4 teaspoon ground cinnamon
2 very ripe bananas, mashed (about 1 cup)
1 cup milk
3/4 cup peanut butter (smooth or chunky- whatever you prefer)
3 tablespoons vegetable oil
1 teaspoon vanilla extract
1 egg, slightly beaten
1 cup semi-sweet chocolate chips
1. Preheat the oven to 350 degrees. Grease two 8x4x2 inch regular loaf pans. Set aside.
2. With a whisk, stir together flour, sugars, baking powder, salt and cinnamon. Set aside.
3. In a mixer, combine bananas, milk, peanut butter, oil, vanilla, and the egg. Add the flour mixture, mixing just enough to combine (don't overmix it, or you'll end up with a tougher bread!) Stir in the chocolate chips.
4. Divide the batter evenly between the two prepared loaf pans. Bake for 45-50 minutes or until a toothpick or small knife inserted in the center comes out clean. Cool in pans for 10 minutes, then remove loaves from pans and cool on a wire rack completely.
Enjoy!
xo H
Monday, July 9, 2012
Rhubarb Crunch
Here in the Last Frontier, it's the season of rhubarb. With our extreme northern latitude, Alaskan summers are in hyperdrive. In a place where sunglasses are often required at 10:30 p.m. (that is not a joke, lower 48ers), we produce such freaks of nature like this pumpkin and this zucchini (nicknamed "Baby"- gotta love a gardener with a sense of humor!)
Alright, so back to what I was saying.
Because of our summer days full of crazy concentrated 20+ hours of sunshine, you'll see a behemoth that looks something like this in practically every yard in Alaska:
When I was growing up, my Mom often made us Rhubarb Crunch and served it up with a scoop of vanilla ice cream- a delicious dessert we enjoyed during the hot Fairbanks summers. Rhubarb is the gift that keeps on giving- once you chop off it's limbs for dessert, it just grows new ones. And the beauty of rhubarb is that once summer is over, you can freeze any unused stalks and enjoy this treat year round.
This dessert is dummy-proof, which is the only kind of baking I'm really successful at (need I remind anyone about the Flat Stanley birthday cake?) Usually I wing it, especially since my beloved mother can't write a recipe down to save her life. But I think it's best to start with a recipe if you've never made something before, and veer off from there once you have the basics down.
For this tasty dish, simply toss the rhubarb with flour and sugar (it will make it's own "juice" once it cooks). The crumbly topping consists of flour, butter, pecans, oats and brown sugar. If you like cinnamon, by all means add a pinch. But I'm not a huge fan, and my Mom never added it, so I skip it.
Sprinkle the crumbly topping all over the rhubarb, and bake until bubbly and golden brown. Mine took 35 minutes flat.
Usually folks call this type of dessert a "crisp". But Mom always called it Rhubarb Crunch when we were kids, and the name stuck.
This delicious dessert comes out sweet, but not too sweet, and with a healthy dose of tartness. Therefore, I think a scoop of good-quality vanilla ice cream (think Haagen-Dazs or Breyers) is essential to complete the dish.
![]() |
| Me, Holly, Claire, and Milo (Photo by the talented Chris Beck) |
Rhubarb Crunch
1 cup sugar
3/4 cup all-purpose flour
1/2 cup pecans
1 stick (1/2 cup) cold unsalted butter, cut into pieces
1/2 cup packed light-brown sugar
1 cup old-fashioned oats
Vanilla ice cream, for serving
1. Preheat the oven to 400 degrees. Coat a 9x13 inch baking dish with cooking spray. In the dish, combine the rhubarb, sugar, and 1/4 cup flour until evenly mixed. Set aside.
2. In a food processor, add the pecans and pulse until the pieces are small but not finely-ground. Pour into another bowl and set aside. Combine remaining 1/2 cup flour and the butter and pulse until the pieces are pea-sized. Add the brown sugar, oats, and the pecans and pulse until combined. Sprinkle the mixture over the rhubarb.
3. Bake for 30 to 40 minutes until brown and bubbly. Serve warm with a scoop of good vanilla ice cream.
Enjoy! xo H
Sunday, February 12, 2012
My Favorite Chocolate Dessert: Brownie Pudding
Valentine's Day is just around the corner, and I don't have to flinch before declaring my favorite non-fussy chocolate dessert: Brownie Pudding. Just reading those words warms my heart and my tummy. I've made this dessert for so many friends over the past couple of years, but none love it as much as my friend Christina. She makes this dessert whenever she has a special occasion, and Christina has no interest in recipes involving many steps and lots of labor. My favorite recipes deliver the most "wow" factor with minimal work, and this one fits the bill. I love this dessert because it even though its super easy to make, it will blow your friends away!
I've said this before, but if I have two weaknesses it's brownies and Cheez-Its. Not necessarily together, but I don't have a problem with mixing them either. If there is a brownie or a Cheez-It within a 1000 ft. radius, I will find them and I will crush them. Self-control goes out the window. It's no different with this dessert: the only problem with this dish is portion control! It's very easy to serve up a huge portion, and it's really hard to stop eating it. No joke: I've overdosed on this dessert on more than one occasion. (An Oscar party with my friend Heather circa 2009 comes to mind.) Trust me...a little really does go a long way. And if you overdose on this rich treat, don't say I didn't warn you!
There's only a few ingredients, so make them good. Use good cocoa powder and real vanilla extract. First, melt two sticks of unsalted butter either in a pan on the stovetop or in the microwave, and let cool. (NOTE: do not leave your bowl of melted butter in the snow on your back porch to cool if you have a dog. This is a TERRIBLE idea, for you and for your dog. Poor Milo. The allure of butter is a weakness for the four-legged creatures as well.) Add the eggs and the sugar to the bowl of an electric mixer and beat on medium-high for 5-10 minutes until thick and creamy.
In the meantime, sift the cocoa powder and the flour together in a bowl. When the eggs are done, add the vanilla extract and the cocoa/flour mixture slowly, and mix only until just combined (overmixing any batter makes it tough). Slowly drizzle in the melted butter on low speed. Pour into a buttered oval baking dish (9x12x2 inches).
The only slightly tricky part of this recipe is that the dish needs to cook in a water bath for gentle, even baking. The way that I do this is to place a large 9x13 inch pan in the oven, then place the oval brownie dish inside. Finally, I fill my tea pot with the hottest tap water and pour that into the large rectangular dish until the water comes halfway up the oval pan. Bake at 325 for 1 hour.
| Baking the pudding in the water bath helps it cook evenly and gently. |
The consistency you're looking for is, simply put, undercooked brownies. The dish gets a lovely crust on the top, and the insides are still ooey gooey. Serve it with a scoop of vanilla ice cream and enjoy a delicious Valentine's day treat!
| I crushed this bowl of brownie goodness as soon as I was done snapping this picture. |
Brownie Pudding
Adapted from Barefoot Contessa
2 sticks unsalted butter
4 large eggs, at room temperature
2 c. sugar
1 t. vanilla extract
3/4 c. cocoa powder
1/2 c. flour
Preheat the oven to 325 degrees. Spray a 9x12x2 inch oval pan with nonstick spray. Melt the butter and set it aside to cool. With the paddle attachment, mix the eggs and sugar in an electric mixer on medium-high for 5-10 minutes or until thick and creamy. On low speed, add the vanilla extract and the cocoa/flour mixture and mix until just combined. Slowly pour in the melted butter until just combined.
Pour the mixture into the greased oval baking dish. Place a larger pan in the oven (I use a 9x13 inch casserole pan), then place the oval dish inside the casserole pan. Fill the larger rectangular pan with the hottest tap water until it reaches about halfway up the oval dish. Bake for exactly 1 hour. Let cool slightly, and serve with vanilla ice cream.
Enjoy! xo H
Subscribe to:
Posts (Atom)